
Meat And Poultry
Stuffed chicken breast: making and cooking a pocket
Practise a small filling, make a controlled pocket and allow for the extra cooking needed at the centre.
Before you begin
- Cook a plain chicken breast in the ovenComplete the plain chicken route first; it is also the fallback if the pocket is difficult.
- Knife confidence: the safe claw gripLearn secure grip, stable cutting and safe pauses; the horizontal pocket needs the different support position taught here.
- Clean and set up your kitchen before cookingPrepare separate raw-contact tools, clean serving tools and the cleanup routine.
- Use an oven: settings, preheating, shelves and the grillIdentify your normal cooking mode and practise both-handed dish handling, not the grill.
- Kitchen thermometer basicsPlace the full sensing area in both meat and filling and hold the lowest relevant result continuously.
- Thermometer cleaning and careSet up the complete washing and food-contact disinfection method before raw preparation.
- Measuring accurately without stressWeigh the cheese in grams; use the separate spoon section for the 15 ml herbs and 5 ml oil.
- Fresh herbs: storing them and using them upOnly wash, dry, chop and measure the parsley; its separate yoghurt recipe is not required.
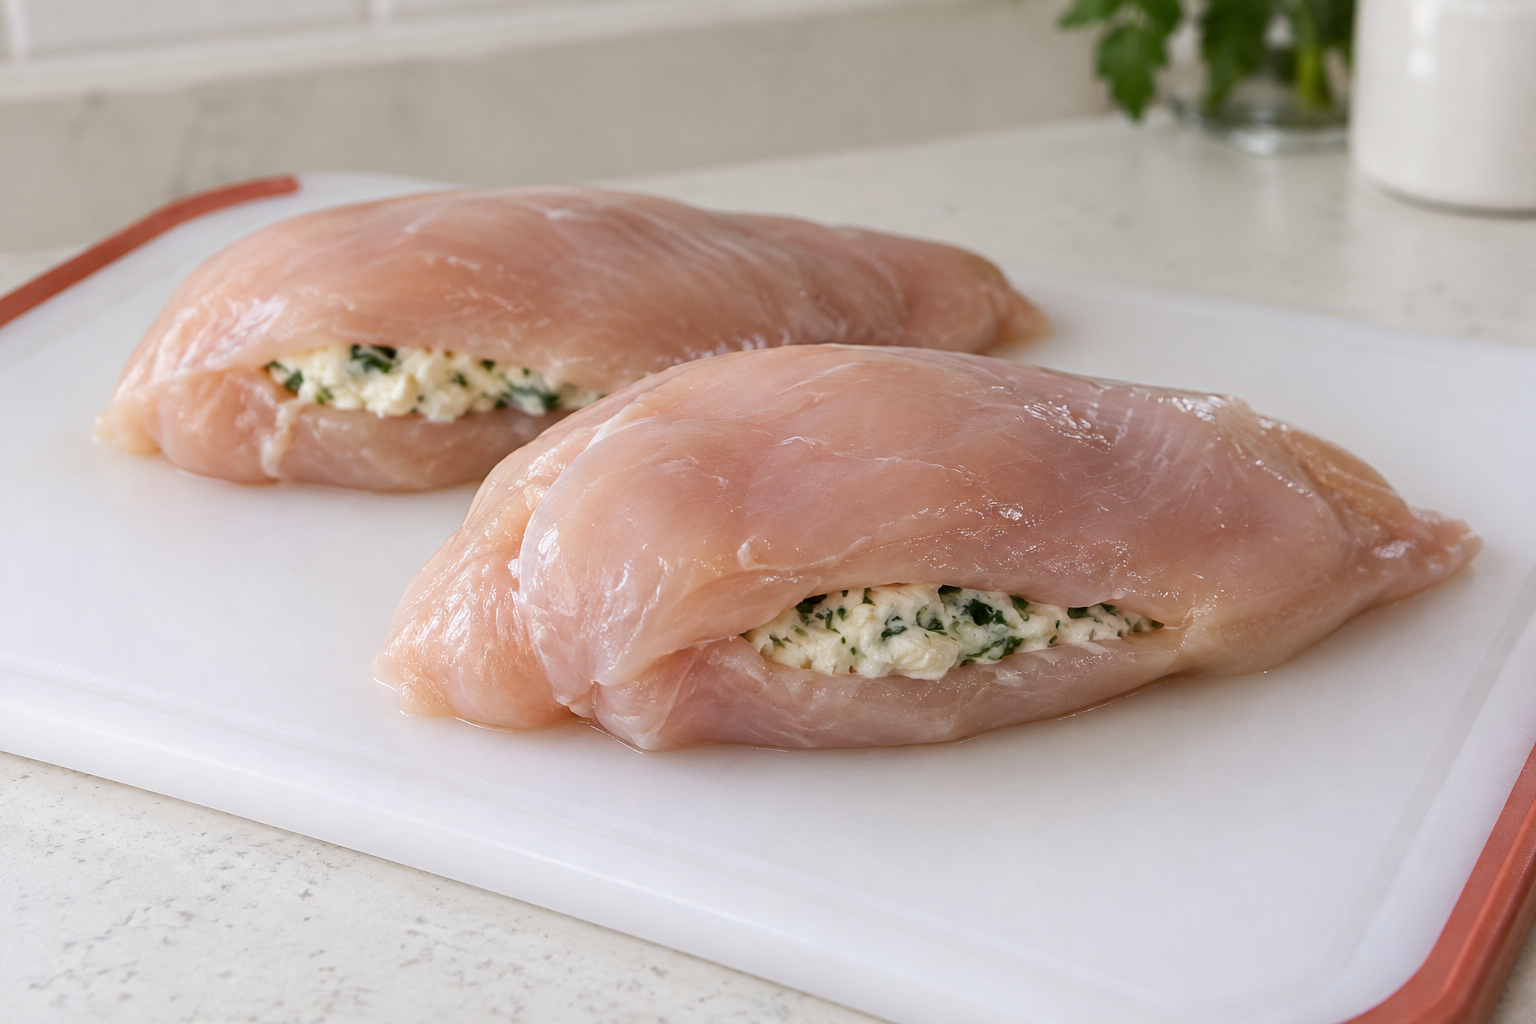
The filling changes the cooking
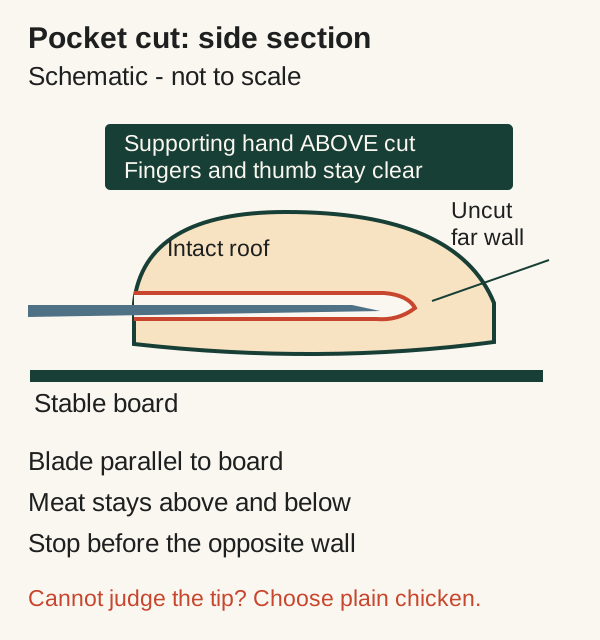
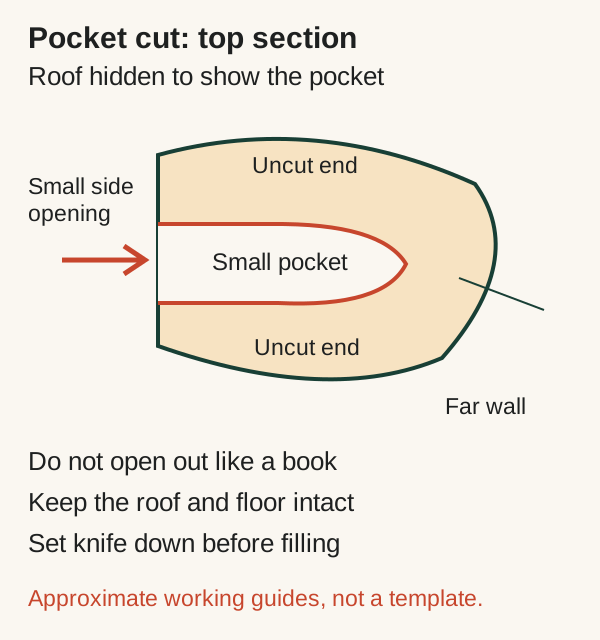
A pocket is a small cavity entered through one side of a breast. Its top, bottom, far side and ends stay joined. It is not a breast opened out like a book, a rolled fillet or a hole cut right through. The filling can receive raw juices: check its centre as well as the meat before eating.
This is a next-step task after the plain oven-breast lesson and probe rehearsal, not the easiest first chicken meal. A vegetable claw grip is not the support position for this horizontal cut. Read the steps and the two pocket diagrams at the end of this guide before opening the packet; practise locating the cut level with the knife set down, not moving towards a hand.
If the breast is too thin, slippery or difficult to steady with your entire supporting hand above and clear of the cut, use the plain alternative below. Do not force the pocket to complete dinner. Someone who can demonstrate the cut in person is useful when you cannot judge it securely.
The quantities, modest pocket and reminder times below are a KINALO-authored teaching adaptation, not a physically tested recipe. The linked test-kitchen recipes inform side-pocket preparation but use different fillings, quantities and oven settings. Their fixed times, photographs and visual doneness claims do not establish an endpoint for this practice.
For two practice portions
- Measuring accurately without stressUse level marked 15 ml herbs and 5 ml oil, not guessed spoon sizes.
- Storage and reheating basicsFinish a complete fridge thaw; use within 24 hours of full thaw or the stricter packet limit.
- Two plump boneless, skinless chicken breasts, each about 150 to 200 g, within the packet use-by and opening limit. Use chilled breasts, or completely fridge-thawed breasts still within the allowed thawed-use period; no icy centre. Do not use mini fillets, very thin pieces, bone-in portions or a product whose instructions require a different preparation. Keep chilled until needed.
- 40 g plain ready-to-eat cream cheese and 1 level marked 15 ml tablespoon washed, dried, finely chopped parsley. Optional: a few turns of pepper, set out separately before raw handling. Check milk and other actual ingredient allergens and existing opening dates. No cocktail sticks, bacon wrapping or extra filling for this first attempt.
- 5 ml cooking oil suitable for the oven temperature, digital scales, marked 5 ml and 15 ml measuring spoons, clean small mixing bowl and cover, mixing spoon, two little filling bowls with covers and an ordinary small filling spoon. An eating spoon fills the pocket; it does not measure the recipe.
- A stable raw-meat board on a non-slip mat, disposable kitchen paper, a suitable sharp small knife whose tip and movements you can control, raw-handling tongs and their rest, and a small separate dish for the premeasured oil. Use the herb lesson's clean board, sieve and drying tools before establishing the raw-meat area.
- A sturdy rimmed oven-safe dish large enough for both breasts with a little gap and grip space, rated for the chosen heat; no lid or paper lining. Two dry heat-resistant oven gloves, full-base trivet on a clear worktop, suitable food probe with its instructions and cleaning kit, seconds timer and clean probe rest. Set out separate clean serving tongs, two plates, normal eating cutlery and ready-to-eat bread kept away from raw juices.
- Optional board slicing needs a separate clean stable board, fork and suitable sharp knife. For saved untouched food, have shallow containers, covers, labels and pen ready. Do not add a second unfamiliar hot side to this first pocket practice.
Set up before opening the chicken
- Use an oven: settings, preheating, shelves and the grillUse the cold dish rehearsal before a filled lift.
- Fresh herbs: storing them and using them upPrepare the parsley, not the herb-yoghurt meal.
- With the oven cold and off, clear stored items and fit a level middle shelf as the manual directs. Rehearse lifting the empty dish with both gloves, carrying it level and landing its full base on the trivet. Check the route, grip and weight before heating; obtain help or use a manageable dish if it is awkward.
- Prepare the parsley using its linked wash, dry and small-bundle chopping routine, then measure the 15 ml spoonful lightly and level. Set the knife down safely before gathering herbs. Clean that preparation station before raw chicken comes out.
- Put the clean mixing bowl on the scales, choose grams, tare to zero and add 40 g cream cheese gradually. Add the measured parsley and optional pepper; stir with the mixing spoon until green pieces are spread through. Divide between the two little bowls, approximately half each. Cover and refrigerate while finishing setup. Put the original cheese tub away; do not take it to the raw board.
- Measure 5 ml oil level into its separate small dish and put the bottle and measuring spoons away. Put bread on the clean serving plates and protect them from splashes. Set out raw tongs and rest separately from clean serving tools; have the probe, cleaning kit and timer ready.
- Select normal baking at 200 degrees C conventional or 180 degrees C fan, not grill or defrost; follow different applicable product instructions first. Start the oven and wait for its actual preheat signal. Keep the chicken and filling chilled until the preparation station is ready.
Make and fill the pocket
- Knife confidence: the safe claw gripUse its knife grip and safe pauses, but the palm-above-cut support described here for the pocket.
- Use an oven: settings, preheating, shelves and the grillUse the complete both-handed loading method.
- Wash and dry hands. With clean hands bring out both filling bowls and the chicken only once the preheated oven and whole raw station are ready. Choose a packet with a peel-open tab and pull it back with the packet supported in the raw area; do not slash towards your hand with a knife. Use raw tongs to place the first breast on the stable raw board, its broad smooth surface uppermost and the thicker long side towards your knife hand. Leave the other on the separate raw-contact preparation area, not a clean serving plate. Blot excess moisture gently with disposable paper and bin it; do not wash the meat. Complete both pockets and load promptly as one continuous job, without another preparation task or fridge visit in between.
- With the knife lying securely on the board, identify a horizontal cut halfway between the top and board. Plan a small opening in the thicker long side, not at the thin point. Your other palm will steady the top gently: every finger and thumb stays flat on or above that upper surface, away from the edge and potential blade exit. Do not wrap fingers around the sides, hold the far side, press down so the breast becomes thin, or use a claw grip below the cut level. Stop for the plain alternative if you cannot maintain that position.
- Pick up the knife by its handle with a secure grip. Keep its blade parallel to the board, never angled upwards towards the supporting hand. Starting at the intended opening, use small controlled horizontal strokes to make a slit roughly 3 to 4 cm long. Advance the tip only a little into the thicker centre; do not push it across the whole breast. Leave about 1 cm of meat uncut at the far side and both ends, plus an intact roof and floor. These are working guides, not measurements you must chase with a knife inside.
- Keep the cut modest: the small filling does not need the entire breast hollowed out. Stop the knife before changing either hand position. If you cannot judge the tip, the meat moves, the blade slips or a wall tears, withdraw carefully, set the knife flat and fully supported with the edge away from reach, and stop enlarging the cut. Never pry the cavity open with the blade or reach fingers into a pocket while the knife is there.
- Once the knife is set down, use the small spoon to ease that breast's filling into the side pocket a little at a time. Stop when the edges can meet without stretching; unused excess from this working bowl goes to raw-contact waste, not the original cheese tub. Do not force all of it in or taste it. The spoon and bowl are now raw-contact.
- Use raw tongs to put the breast in the oven dish, resting flat without forcing its opening upright. For the second breast, repeat the same small cut with the second filling bowl; do not put the used spoon into any clean food intended to be served uncooked. Put both breasts in the dish with a gap. Tip the premeasured oil over them and use the raw tongs to turn them gently to spread it, finishing flat. Set raw tools on their separate rest, bin packaging and wash and dry hands.
- Before the hot oven, rehearse the filled cold dish's actual grip and level lift onto the clear trivet. This dish and its handles must be safe to grip, clean and dry on the outside. If raw juices reached them or the counter, leave the food secure, clean/disinfect those surfaces appropriately and wash hands again before touching gloves or controls. Do not improvise a hot lift with a slipping or unmanageable dish.
- Once preheated, open with face and bare forearms back from escaping heat. Use both dry gloves to carry the dish level onto the supported shelf, release only when secure, and close the door. Set a first 25-minute checking reminder from loading, earlier if the product instructions require. This is not a promise of a finished centre.
Check both meat and filling
- Kitchen thermometer basicsPosition the complete sensing area and hold the lowest relevant centre result, not an average.
- Thermometer cleaning and careUse the complete cleaning/disinfection method, not a cloth wipe.
- Use an oven: settings, preheating, shelves and the grillMove the level dish to its trivet and explicitly switch heating off.
- At the reminder, have the trivet, gloves, probe and timer ready. Open with face back, grip both dish sides through dry gloves and carry it level onto the trivet. Close the oven door before checking. Keep raw tongs available only if needed to steady a breast; do not hold hot meat with fingers.
- Clean/disinfect the probe using its full care routine, confirm degrees C and locate its sensing area. Insert carefully from the side into a thick area of meat beside the pocket so the whole sensing area lies in that meat's centre, not the filling, pan or a thin outer flap. Wait for a settled display. Check another thick meat area if potentially cooler.
- Then clean/disinfect the probe and check the middle of the filling through the opening, with the whole sensing area covered. A reading from a leaked puddle or the hot outer edge is not a filling-centre result. Use a suitable thin-tip probe if the sensing area cannot fit; do not call a shallow reading complete. Clean between foods and after any undercooked check, and check meat and filling in both breasts.
- For this practice, each potentially colder checked meat and filling centre must stay at or above 75 degrees C continuously for 30 seconds. Keep the probe safely positioned for the complete timed hold if its instructions permit; remove it afterwards. A brief 75 display, an average of results, white meat or bubbling cheese is not the check. Never close a handheld probe in the hot oven.
- If any centre is below target or drops during its hold, remove the probe, return the dish securely with both gloves and cook for about 3 to 5 minutes more. Set a fresh recheck reminder, then repeat the relevant checks with a cleaned probe and restart incomplete holds. Total time varies with actual thickness, filling and oven. Do not eat an unverified portion to avoid overcooking it.
- Once both breasts pass, remove the probe, switch the oven heating fully off as the manual directs and leave the dish level on the trivet. A separate timer does not switch it off. Use the separate clean serving tongs to put each breast on a clean plate, not the raw board. Rest for about 5 minutes as a serving/texture pause, not a replacement for the completed safety holds. Eat promptly with the prepared bread and normal cutlery; allow your own bite to cool.
- Optional board slicing: after the short rest, move a breast onto the separate clean stable board with clean serving tongs. Steady it with the fork, fingers behind its handle and clear of the cut. Hold the knife by its handle and use short gentle drawing strokes down to the board for about 1 cm slices. Stop the knife before moving the fork; do not hold the hot meat with fingers. Set the knife down safely before transferring slices with clean tools. Some filling may run out; it is not a reason to chase the slice with a moving blade.
When filling leaks out
- Use an oven: settings, preheating, shelves and the grillRead its smoke/fire and safe-stop instructions before cooking.
A little cheese escaping is ordinary. Do not spoon it back into a partly cooked pocket or treat its bubbling as a safety test. If a wall tore during preparation, stop cutting. With the knife set down, spoon surplus filling into raw-contact waste and leave only a thin amount that can sit without stretching. Continue cooking the breast without relying on that wall to seal; still check every remaining filling centre and the meat. If safe control is lost, stop and get help rather than force a repair.
If the top colours too quickly but there is no smoke, with the dish secure on its trivet reduce the normal baking setting by about 20 degrees C and return it for further centre checks, setting another reminder. Lower heat can extend the time: it is not permission to skip the endpoint. This first walkthrough does not require loose foil, handling a second hot receiver, or a grill finish.
Dark leaked deposits are not a sauce to rescue. If they are catching badly and cannot cook further without burning, stop heating and choose another safely prepared meal rather than serve chicken with an unverified centre. For smoke inside the oven, switch off only if safely reachable and keep the door closed; do not open it to investigate or carry smoking cookware. For fire, leave, close doors if safe and call 999 from safety. Follow the oven lesson's full stop routine.
Choose plain chicken when the cut is difficult
- Cook a plain chicken breast in the ovenUse the complete plain method and its per-breast quantities, not a guessed shortened bake.
Stop the knife and set it down safely before changing plans. For a breast that has not received filling, follow the complete plain oven-breast method, including its oil amount per breast, spacing, individual centre holds and clean serving. Its published quantities are for one breast; use them for each plain breast if cooking both. A small abandoned slit does not make the cold centre safe.
Only serve herb cheese cold if it was kept chilled and remained completely separate from raw chicken, its spoon, hands and working area. Use a separate clean spoon after checking its existing ingredient deadlines. Anything from a raw-contact filling bowl cannot become the cold accompaniment. If filling has already entered the breast, follow the cooked filling checks above even if you remove most of it; do not simply switch to meat-only checks.
If a torn or awkward piece cannot be handled and checked safely, discard it and use a new portion or another meal with its complete lesson. A fallback is a way to finish safely, not an instruction to continue a cut that feels uncontrolled.
Keep preparation and storage straightforward
- Storage and reheating basicsFollow shallow cooling, original-date labels and single-reheat history.
- Use a microwave and check for even heatingUse the container and control lessons, but your own applicable meat-reheating instructions, not the soup demonstration's times.
Prepare and cook the filled breasts in one session; this lesson does not teach advance raw stuffing or leaving partly cooked chicken to finish later. Do not taste any raw-contact filling.
For untouched spare food, use clean tools for small shallow portions and begin the cooling reminder when cooking finishes, before the serving rest. Cool and refrigerate within one to two hours; label the original cooking date/time. Eat within 48 hours or a stricter applicable ingredient limit, or freeze promptly by the storage lesson. Do not keep unsafe or uncertain handling history.
For an optional later reheat, follow the storage and microwave lessons for suitable vented containers, smaller portions, turning, standing and full hot-centre checks. Your microwave manual must provide an appropriate meat-reheating method; do not borrow its soup packet times for this chicken. Slice a safely chilled portion using the controlled fork-and-board sequence above if the method calls for smaller pieces, and check both meat and filling after heating. Remove the metal probe and cutlery before every powered interval. Reheat only once; a refrigerated or frozen reheated portion does not acquire another allowance.
Finish and reset the chicken station
- Clean and set up your kitchen before cookingFollow washing, food-contact disinfection and separate visible-knife cleanup.
- Thermometer cleaning and careClean the final probe and its storage protection.
Check the oven heating controls are off. Leave the dish secure on its trivet, out of reach, until cool enough for its maker's washing method. Recently used shelves and the oven remain hot; do not pour cold water into a hot dish or put hot fat into the bin or sink.
When the hot task is safely finished, wash raw bowls, spoon, tongs/rest, board and other raw-contact surfaces, then disinfect as the complete setup lesson and product labels require. Wash the visible knife separately, dry and store securely; never hide it in a washing-up bowl. Clean/disinfect and dry the probe and its sheath by their own directions. Wash hands after handling contaminated tools and before handling saved food. Finish chilling saved portions within their original window; cleanup does not restart the clock.
Sources and further reading
- Food Standards Agency: cooking food safely
- Food Standards Agency: chilling, freezing and defrosting
- Food Standards Scotland: separate raw and ready-to-eat preparation; do not wash poultry
- Good Food test kitchen: side-pocket soft-cheese technique; a different recipe, not our quantities or timing
- Betty Crocker test kitchen: a horizontal side slit that stops before the opposite wall; a different recipe
- Good Food team: hand above a side cut; this pocket is not its full butterfly-and-flatten method
- Health and Safety Executive: suitable sharp knife, stable surface and careful cleaning