
Meat And Poultry
Roast and spatchcock chicken: shape, heat and safe doneness
Prepare a whole chicken, understand why flattening changes its cooking and check the thickest parts before serving.
Before you begin
- Use an oven: settings, preheating, shelves and the grillPreheat on the right function and move a hot tray to a trivet.
- Kitchen thermometer basicsPlace the sensing area in the food centre and hold the temperature for its full time.
- Clean and set up your kitchen before cookingKeep raw-food preparation separate from cooked food and serving tools.
- Knife confidence: the safe claw gripStabilise the board and keep the supporting hand out of the cut.
- Storage and reheating basicsThaw a frozen bird fully in the fridge before this method.
- Measuring accurately without stressMeasure 15 ml oil and optional salt before touching raw food.
- Thermometer cleaning and carePrepare the actual probe cleaning and food-contact disinfection method before four separate checks.
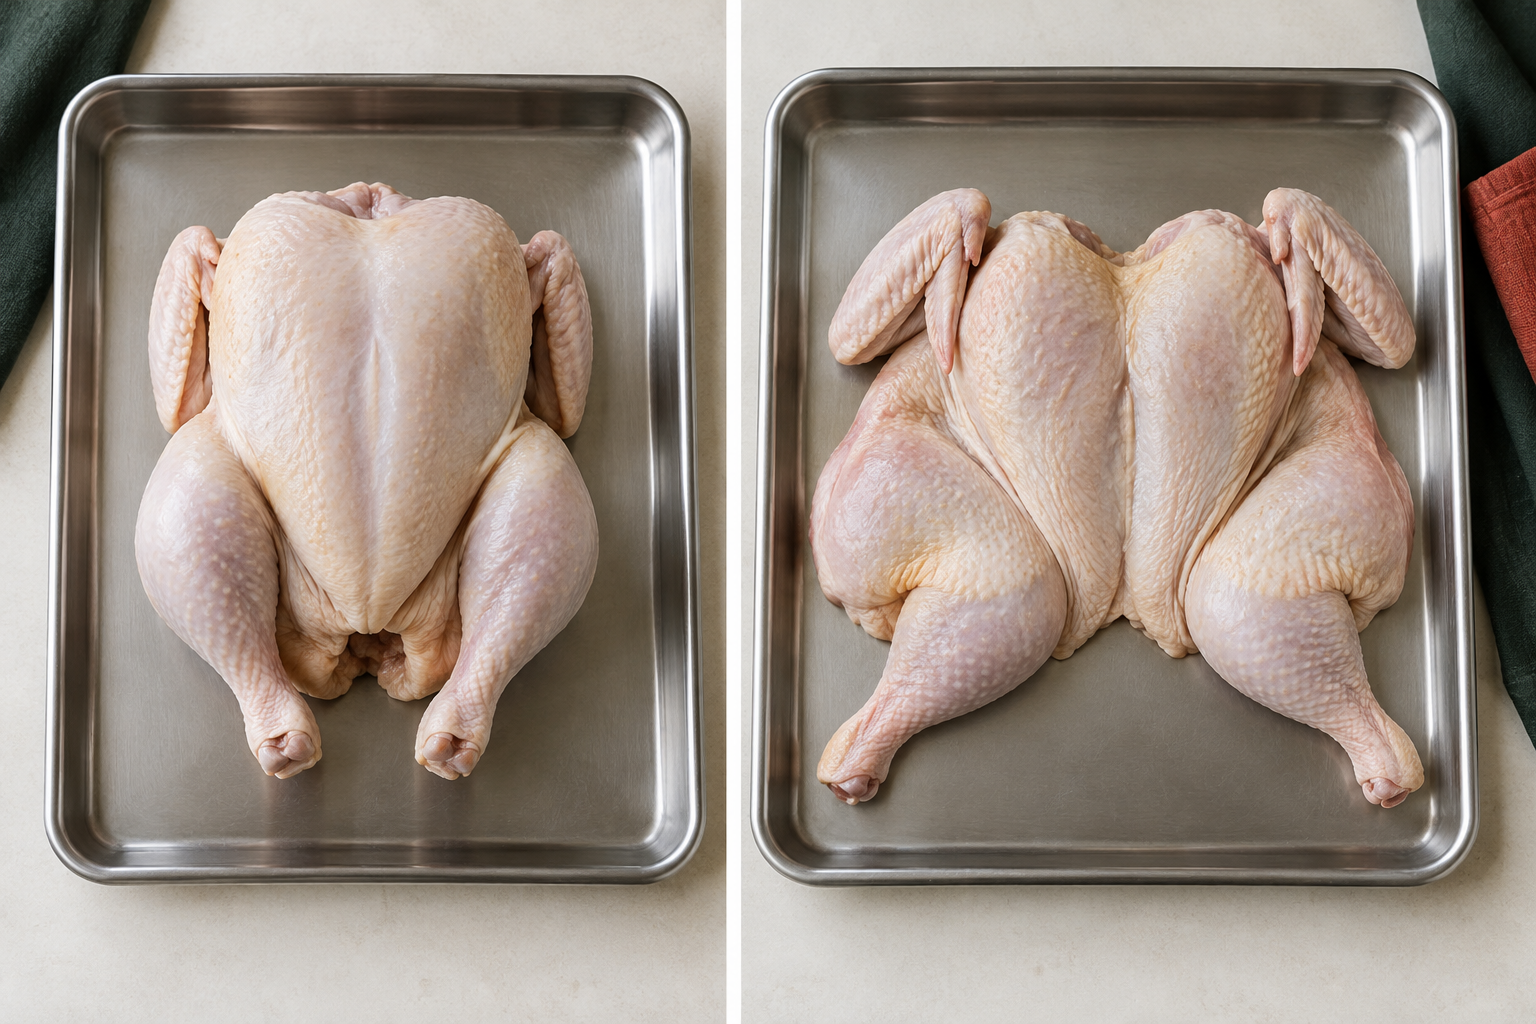
Choose the preparation you can handle
Roasting cooks chicken in the oven. A whole bird has a thick breast, legs and a cavity, so it does not heat evenly. Spatchcocking removes the backbone and flattens the bird. The flatter shape exposes more surface and generally cooks faster, but it still needs temperature checks.
For a first attempt, buy a ready-prepared bird or ask a butcher to spatchcock it. You can learn oven control and doneness before doing poultry butchery. Keep the skin on if you want a browned surface and some protection during cooking; removing it is a preference, not a compulsory safety step.
Use one preparation per attempt: either the intact whole-bird route or the flattened route below. Both finish with the same multi-point temperature check and carving steps. For the first meal, keep accompaniments simple; the linked meal-coordination lesson explains how to add more hot components later.
These are KINALO teaching routes, not physically tested recipes. Published roast and spatchcock examples inform the method, but our plain oil, empty cavity, checking reminders and supported handling are adaptations. Use the actual product instructions first. Do not assume an external recipe's timing or clear juices replace our centre checks.
Get the equipment ready
- One plain, unstuffed chicken around 1.4 to 1.6 kg, enough for roughly four portions, fully thawed and within its use-by and after-defrosting limits. Keep its weight and packet instructions. This is not a timing for a frozen, stuffed or much larger bird.
- 15 ml cooking oil, measured as one level marked tablespoon. Optional: one level marked 1.25 ml quarter-teaspoon of fine salt, and a few turns of black pepper; omit salt if you lack that measure. Use a small dish, filling spoon, 15 ml measure and optional 1.25 ml measure/table-knife back to prepare these before touching raw food. Leave the cavity empty.
- A rimmed oven-safe metal tray with grippable sides, room around the bird and space for it on the oven shelf; two dry intact heat-resistant oven gloves, a full-base dry trivet, seconds timer, cleaned suitable food probe and a separate clean stable grooved carving board. Also have a piece of kitchen foil ready if the oven and tray instructions permit loose food shielding.
- A sharp carving or chef's knife, carving fork, strong heat-safe tongs and TWO broad heat-safe turners for supporting the bird underneath, a serving platter and shallow leftover containers. Use clean cooked-food tools, not the utensils that touched raw chicken. Set board and platter beside the tray landing place, away from the edge.
- If the packet requires cutting a disposable tie, have clean suitable kitchen shears; cut only the tie away from fingers and discard it. For home spatchcocking, proper poultry shears designed to cut small poultry bones, a large non-slip raw-food board, separate raw-food tongs and supporting turner, and a waste bag are required. Household scissors or a small knife are not substitutes for the bone-cutting job. Ready-spatchcocked chicken avoids that extra task.
- Clean hands, worktop and tools before starting. Do not rinse raw chicken. Prepare any salad first and put it safely away; raw juices must not reach food that will be eaten without further cooking.
Roast a whole bird
- Read the packet before opening. With oven cold and off, clear it and set a middle or slightly lower shelf allowing headroom above the bird. Rehearse an empty-tray two-glove lift and level landing on the trivet. For this plain 1.4 to 1.6 kg example, select 200 degrees C normal conventional cooking OR 180 degrees C fan, not grill, unless the product specifies differently. Preheat fully using the model's signal.
- Open the pack at the raw-food area. Remove absorbent pads and any giblet bag from the cavity, checking the packet for ties or packaging that must be removed. Cut disposable ties with shears directed away from your hands if needed; do not leave unknown plastic in the oven. Do not wash inside the cavity.
- Set the bird in the tray breast-side up: the breast is the broad rounded meaty side, with the legs sitting to either side. Spoon the measured oil over the skin and spread it with the spoon, then add the optional seasoning. This spoon is now a raw-food utensil. Wash hands and clean touched handles before using the oven.
- Keep the tray's outside/grip areas free of raw juices and the gloves clean and dry. Before loading, check the actual filled cold tray's weight and grip on the worktop and trivet, not inside the hot oven. Get assistance if unstable. Open with face and forearms back, carry level, set fully on the shelf before releasing and close. Start a first-check timer around 75 minutes, or the packet's earlier point. Around 80 to 100 minutes is only our planning range; actual checks decide. Do not baste or turn during this first practice.
- At the check, move the tray to the trivet and close the oven door. Follow the temperature-check section below in both breasts and both inner thighs. If any point is below the required temperature and holding time, return the bird to the oven for 5 to 10 minutes, clean the probe and check again. Never serve just because the timer ended.
- Once all four checked thick areas pass, turn the oven's cooking and temperature controls off as its manual directs. Leave the tray supported on its trivet. Do not lift a heavy slippery bird immediately just to copy a recipe: resting it in the tray is the simpler first choice. Rest about 10 to 15 minutes after the successful checks, longer if it is still too hot to handle comfortably. Rest is not a substitute for cooking the centre.
- For the short move to the clean board, use the clean fork/tongs to steady the bird while sliding one broad heat-safe turner underneath from one side. Rest that tool securely; put the fork/tongs safely aside, then slide the second turner underneath from the other side. With one turner handle in each hand, support the weight from beneath, keep the body level, lift just clear and land it on the stable board before withdrawing them. Keep face and hands away from hot cavity liquid; do not tip it deliberately, grip one leg or balance it on a knife. If the tools cannot support it under control, leave it in the supported tray to cool further and get help. Never put the cooked bird onto its raw-food board.
Check four thick areas, not the colour alone
- Kitchen thermometer basicsPlace the sensing area in the food centre and hold the temperature for its full time.
- Thermometer cleaning and careClean between undercooked and later checks without immersing the display.
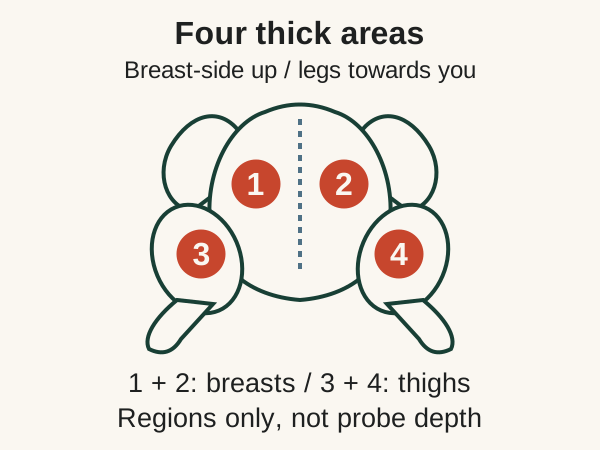
- Keep the bird stable on the roasting tray while checking. Identify the two thick breast lobes on either side of the breastbone and the two inner thighs where each leg meets the body. Do not put the probe into the empty cavity and call that the chicken temperature.
- Insert the cleaned probe into the centre of a thick breast from the side or at a shallow angle, keeping its sensing area within meat and away from the tray and breastbone. Wait for the reading to settle. For this lesson, the centre must stay at or above 75 degrees C for 30 seconds, or 70 degrees C for 2 minutes.
- Start the holding timer only when the target is reached and keep the probe in that location. If it falls below the chosen temperature, cook further and restart the full hold. A brief flash of 75 is not the same as holding it.
- Remove, clean and disinfect the probe as its maker and the care lesson direct before each separate location, particularly after any undercooked reading. Check the other breast, then each thick upper thigh where it joins the body, not just the narrow lower drumstick. Approach the thigh from its inner side with the sensing area inside thick flesh, away from the joint and long bone. If it meets hard bone or reads the hollow cavity, withdraw and reposition; never force it. Repeat the full settled reading and chosen continuous hold at each point.
- Any failed point means more oven cooking before serving. Clean the probe, return the tray with dry gloves and set a fresh 5- to 10-minute reminder before repeating the four checks. Do not leave an instant-read probe in the oven. If the skin is darkening, use the foil procedure below. If you cannot keep the required reading positioned safely outside the oven, stop and get suitable equipment or competent help rather than accepting a momentary high number.
If you want to spatchcock it yourself
- Do this before oiling or cooking. Stabilise the large raw-food board and have the tray and waste bag beside it. Remove packaging and giblets as above. Place the bird breast-side down with its legs towards you; the narrow backbone runs down the middle of the upper surface.
- Grip the poultry shears securely. Keep your other hand on a side of the bird well away from the cutting line. Starting at the tail end, make small controlled cuts along one side of the backbone, cutting through the thin rib bones towards the neck. Do not point the shears towards the supporting hand.
- Repeat along the other side and lift out the narrow backbone strip. Do not saw through it with a small kitchen knife or use body weight to force jammed shears. If the bird slides or the tool will not cut under control, stop, cover and refrigerate promptly while arranging competent help; do not keep escalating force.
- For this first practice, discard the raw backbone and any loose fragments into the waste bag. The separate stock lesson uses a cooked carcass, not raw bones substituted into its method. Check the cut edges visually for loose bone fragments and remove obvious pieces carefully with tongs; do not rinse the bird.
- Open the two sides apart, turn breast-side up and spread the legs out on the board. Put the heel of your hand over the middle of the breastbone, with the other hand over it if helpful, and press straight down firmly until the bird lies flatter. Stop if the board moves. Do not add knife scoring as an extra task.
- Move the raw flattened bird skin-side up to the roomy tray using the raw-food tongs and a supporting raw-food utensil, not the clean carving tools. Clean and disinfect the board, tools, touched worktop and handles by the setup lesson and each product's directions. Wash hands. Finish with the complete flattened-bird roasting route below; do not begin a second whole-bird cooking cycle.
- Once prepared, the bird is still raw. Follow the flattened-bird route below for oiling, cold-load grip, preheating, actual cooking, four checks, resting and carving. Home preparation does not change its storage limits or lower the cooking target.
Roast a prepared flattened bird
- Use an oven: settings, preheating, shelves and the grillUse the same level two-glove lift, heat-clear landing and explicit controls off.
- Kitchen thermometer basicsThe flatter preparation still needs centre depth and full time at every checked location.
- Use this route for a butcher-prepared spatchcocked bird or one prepared by the preceding home method, not both roasting routes in sequence. Keep it chilled until preparation; read its weight, date, fully thawed status and all packet directions. Remove packaging, pads and any loose giblet bag without rinsing the bird. Do not treat a flattened bird as ready to eat.
- With the oven cold and off, clear it and choose a middle shelf with headroom for the tray. Rehearse the empty-tray lift and full-base trivet landing with both dry oven gloves. Preheat normal cooking to 200 degrees C conventional OR 180 degrees C fan, unless the product specifies differently. No grill finish or mid-roast flip is needed for this first lesson.
- Put the bird on the roomy rimmed metal tray skin/breast-side up, legs spread naturally without piling underneath. Spoon over the separately measured 15 ml oil, spread with that spoon and add optional measured seasoning. This is now a raw-food spoon. Wash hands and clean raw-contact handles; tray grips and gloves must remain clean and dry.
- Before opening the hot oven, check the actual cold filled-tray lift and level landing on the worktop/trivet. Do not put it in the oven during this grip check. Resolve a heavy or slippery load with assistance. Load as in the oven lesson and set a first reminder at about 35 minutes, or an earlier packet point. Roughly 35 to 60 minutes is a planning range for this size and shape, not an endpoint or guaranteed time.
- Use dry gloves to land the tray on the trivet and close the door. Perform all four separate breast/thigh centre readings and continuous holds above. Any failed area needs another 5 to 10 minutes and a fresh reminder, followed by cleaned-probe checks. Flattening does not make the narrow leg tip or skin colour represent the whole bird.
- After all checks pass, switch oven controls off and use the whole-bird lesson's supported tray rest and two-broad-utensil transfer. Carve by the joint/breast procedure below. Serve promptly and start the spare-meat cooling reminder from the end of oven cooking, not from the end of dinner.
Troubleshooting the roast
If skin darkens before the centre passes, use dry gloves to land the tray level on its trivet and close the oven door. Before working near it, let vigorous sizzling settle. With hands clear of hot food and tray, lay the prepared permitted foil loosely over the dark upper area, using a long heat-safe utensil to nudge it if needed; do not press onto the skin or tuck it with bare fingers beside hot metal. Keep foil contained on the tray, clear of the oven element and vents. Return with dry gloves and continue the short reminders and four-point checks. If foil cannot be placed under control, get help; a burnt outside does not authorise serving a raw centre.
If the surface is pale, check normal cooking mode, preheat and whether the tray is flooded with liquid. Do not keep safely cooked chicken in the oven indefinitely for darker skin, or begin learning the grill while a hot bird waits. Slightly less crisp skin is a better first result than dried-out meat or an uncontrolled hot transfer.
Carve through joints and around bones
- Bring a simple meal together without rushingPlan extra hot components once the chicken sequence is familiar.
- Boil and steam vegetables without guessingCook a measured vegetable side.
- Gravy thickness and lumpsStart with the complete stock-only gravy method.
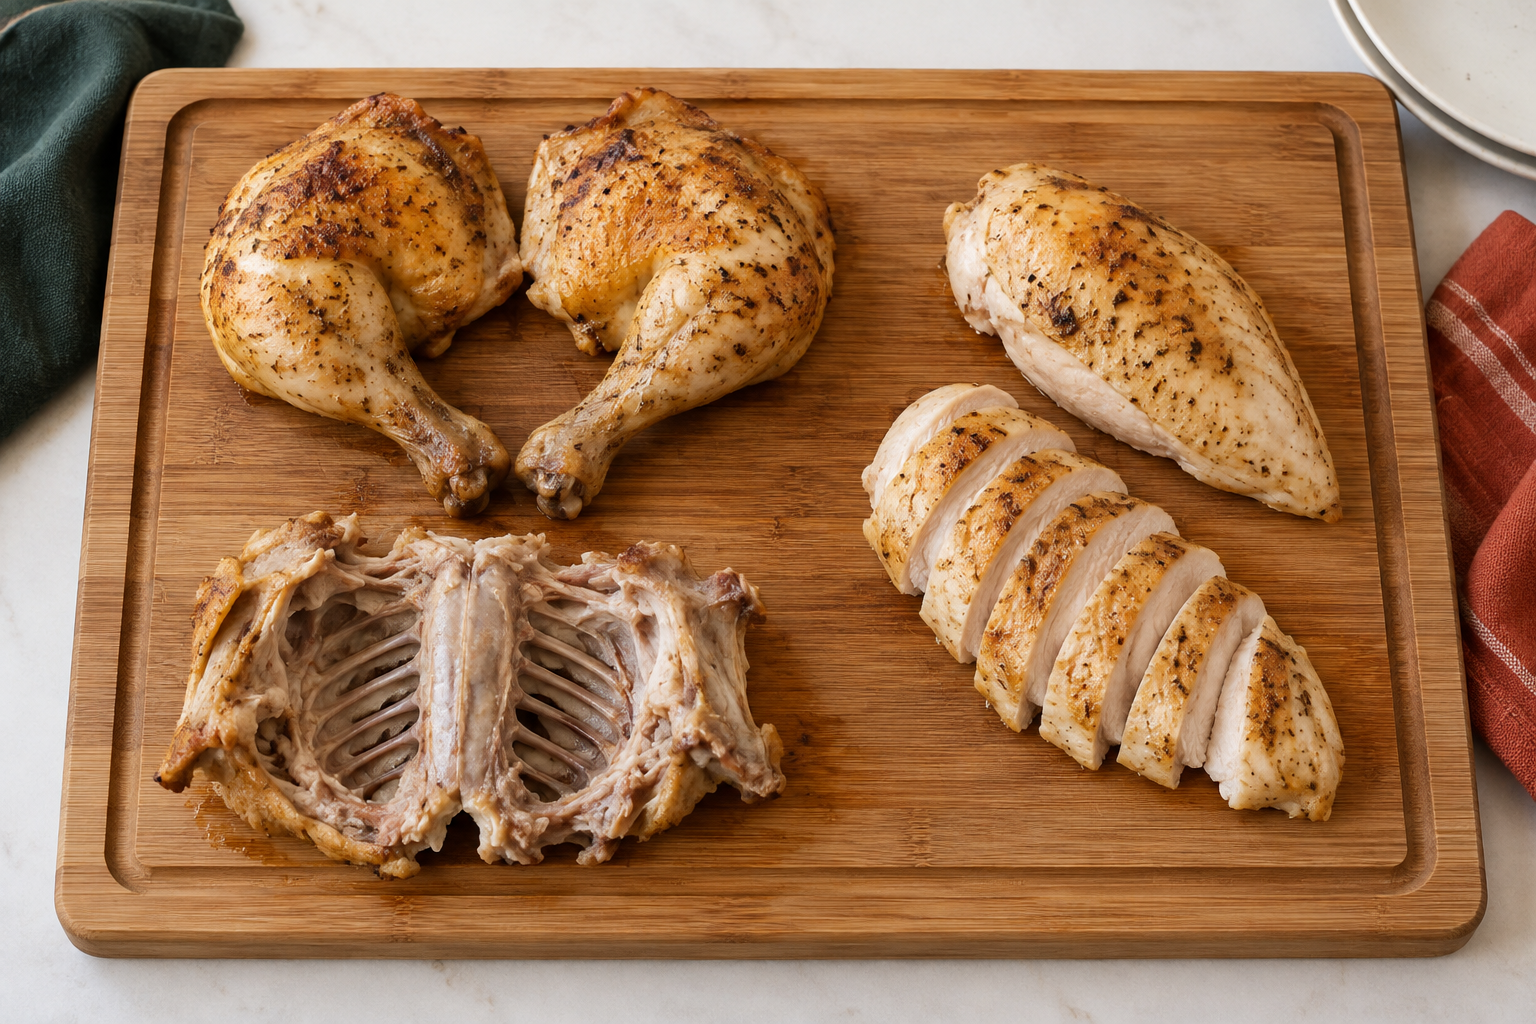
- Use the rested, safely cooked bird on the clean stable board, breast-side up with legs towards you. Keep the platter close. Hold it steady with the carving fork in one hand and the knife in the other, with fork and fingers outside the knife path. Do not grip hot meat in a bare hand.
- Cut just through the skin fold between one leg and the breast, with short strokes away from the supporting fork. Set the knife down while the fork/tongs ease the leg outward. Look for the pale joint gap where the upper thigh attaches to the body. Steady the bird again, then cut the soft tissue in that gap with small strokes, not through hard bone. Lift off the connected thigh-and-drumstick portion with the tongs. If the joint does not release easily, stop and reposition or get a demonstration; do not wrench a slippery carcass. Repeat on the other side.
- You can serve each leg portion intact. To divide it, put it flat on the board, bend gently at the knee with the tongs to find the joint, then cut through the soft gap between thigh and drumstick. If the knife meets hard bone, stop and change position; do not chop harder.
- For the wings, ease each away with the fork or tongs and cut through its joint with the body. Leave a difficult wing attached for now rather than destabilising the whole carcass.
- For breast meat, find the central breastbone ridge between the two breast lobes. Steady with the fork away from the blade. Start a shallow lengthways cut just beside the ridge, then use short strokes down and outward along the curve of the ribs while the fork eases the meat away. Keep the edge following that side of the bone, not crossing it or levering with the knife. When the fillet is free, put the knife down and transfer with the tongs. Repeat on the other side.
- Place each breast flat-side down and slice across into pieces about 1 cm thick. Transfer with the fork or tongs to the platter. Check portions for stray bone before serving. When the remaining carcass is cool enough to handle safely, remove usable meat with clean hands or utensils for prompt storage.
- Serve now. For a first meal, bread and a prepared salad avoid another hot task. Add cooked vegetables or gravy only by following their full linked methods. Collect a clean cooked carcass for stock before anyone eats from it; do not gather bones back from diners' plates.
After the meal
- Storage and reheating basicsCool promptly, preserve ingredient dates and reheat only once.
- Making stock from bones and using pan juicesUse a clean same-session carcass and retain its cooking date.
Set the spare-meat cooling reminder when oven cooking finishes. With clean tools separate spare meat into shallow containers promptly; do not leave the whole bird on the table all evening. Cool and refrigerate within one to two hours, retain the original cooking date/time and use within 48 hours or freeze promptly, keeping earlier applicable limits. Later reheat only the portion needed, only once, until steaming throughout by the full storage lesson.
The stock lesson begins with a clean cooked carcass from this same cooking session and explains how to strain and cool the liquid. Making stock does not erase an older bird's storage history. Wash the carving board, knife and utensils after use, and clean any area reached by juices.
Check the oven controls are off; the tray and ring can still burn. Keep spare carcass handling within the cooling routine or start stock promptly by its full method. Let cookware cool safely, put cooled fat and solid scraps into suitable waste rather than the drain, and wash the visible knife separately. Clean/disinfect any raw-contact area and dry/store the probe by its own directions.
Sources and further reading
- Food Standards Agency: cooking food safely
- Food Standards Agency: chilling, freezing and defrosting
- Food Standards Scotland: raw poultry, handwashing and separate ready-to-eat preparation
- Good Food: spatchcock preparation, adapted with probe checks
- Good Food: spatchcock oven setting example; timing is checked by temperature here
- Jamie Oliver: carving a cooked chicken around its joints
- Good Food: separate whole-roast method informing the handling lesson; our plain-oil practice and setting are an adaptation