
Flavour
Garlic colour: fragrant, golden or burnt
Peel and cut a clove, add pale garlic to a finished onion base, and practise a separate gentle golden-slice topping.
Before you begin
- How to soften onions without burning themPrepare its whole-onion, 2-teaspoon-oil base; this lesson replaces its serving finish.
- Knife confidence: the safe claw gripSet up a stable board and safe small cuts.
- Make a simple tomato sauce from passataComplete the measured sauce and its gentle simmer before tasting.
- How to use hob heat without guessingAdjust heat and support a pan safely before the quick garlic stage.
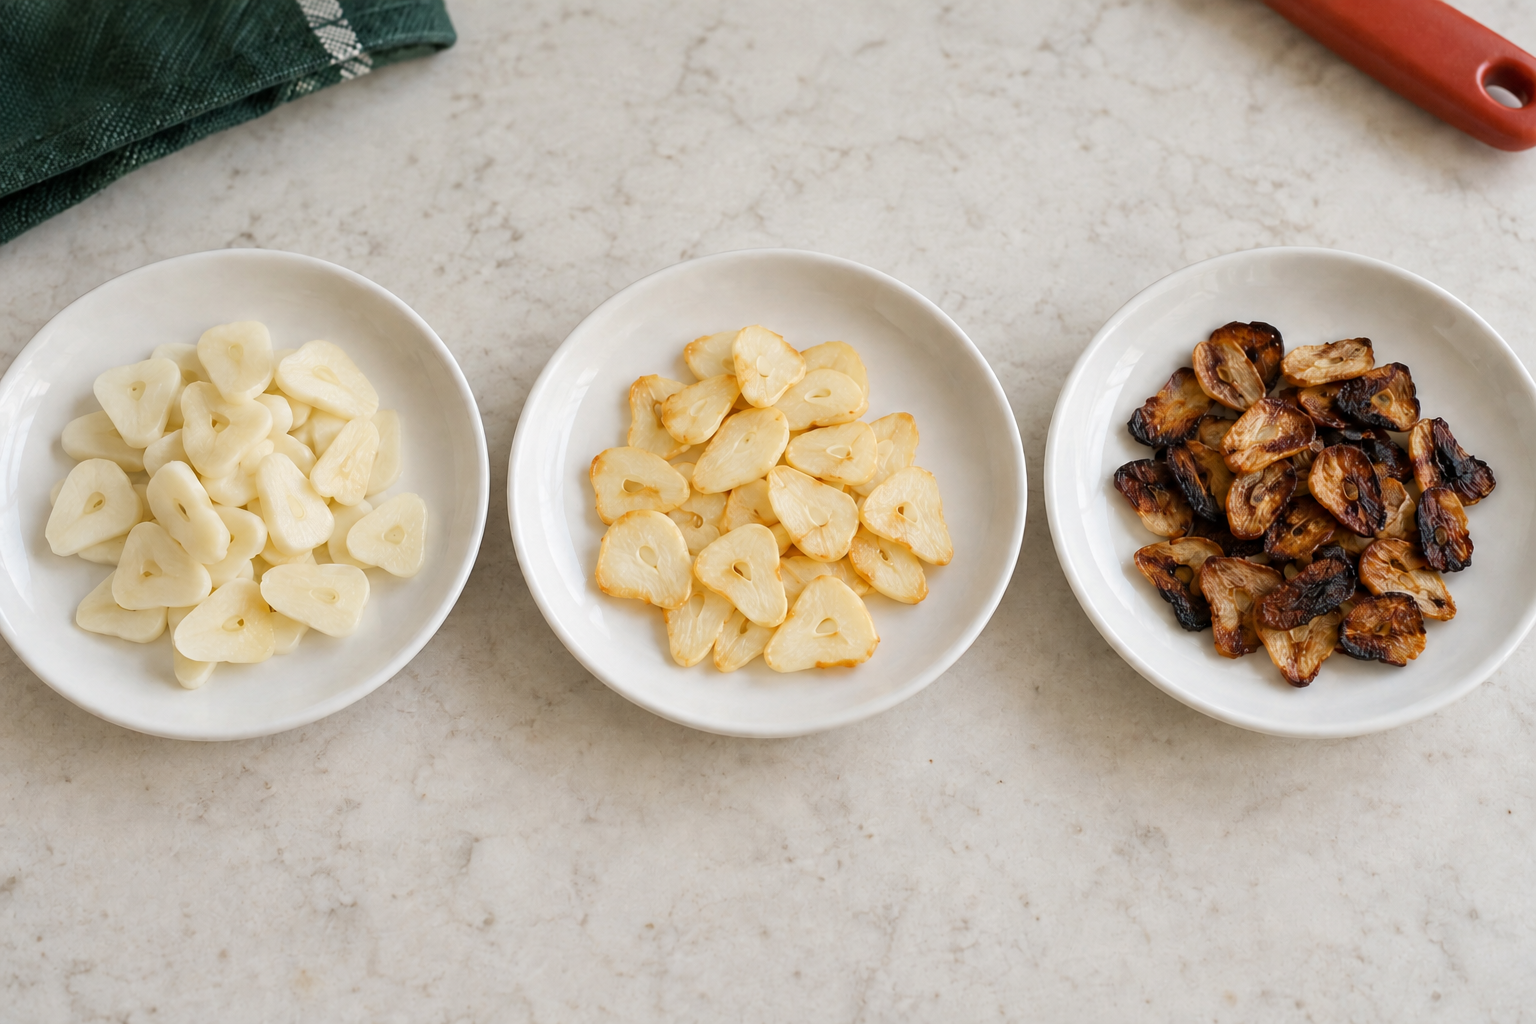
The cut and the heat change garlic quickly
A bulb is the whole garlic head; a clove is one segment inside it. This practice uses ONE clove, not a whole bulb. Chopped or pressed garlic changes quickly because small pieces meet the hot pan readily. Large pieces need a different cooking time.
For the first tomato base, soften the onion first and keep the garlic pale. It need not brown to contribute flavour. The separate sliced topping uses a faint golden edge; dark brown or blackened garlic can become bitter. Colour is a flavour-stage cue, not evidence that stored food is safe.
Read and prepare the next ingredient before garlic goes in. There is little useful time to peel a clove, search for passata or open a packet during that stage.
Prepare a small sauce-base practice
- How to dice an onion without stressPrepare the whole onion before heating.
- Knife confidence: the safe claw gripUse its bridge and tucked-finger grips; get help for an awkward small clove.
- Clean and set up your kitchen before cookingKeep preparation separate from the hob job.
- Prepare one whole medium onion in 5 to 10 mm dice by its complete lesson, 2 teaspoons oil in total, one sound garlic clove large enough to hold safely, 250 g plain passata and 30 ml drinking water mixed in a jug. Have a SEPARATE 30 ml water reserve for the onion stage and SEPARATE 60 ml for later sauce adjustments. Leave salt, herbs and chilli out of this comparison.
- Use the onion lesson's 20 to 24 cm frying pan or roomy saucepan, suitable cooking spoon, timer, dry gloves and trivet. Also have a stable board on a non-slip support, suitable knife, clean garlic-preparation bowl, marked measures, separate clean tasting spoons, a sample cup and used-utensil plate. Ready-to-eat bread is enough for serving; no second cooking task is required.
- With the hob off, separate the clove with your fingers and peel the papery skin. If the skin is tight, gently press the clove on the stable board with the heel of your hand just to loosen it, then peel; do not hit a knife. Put the peeled clove on its widest stable side. Use the safe grip to trim only the hard base, with fingers behind the cutting path. Stop if the clove rolls or is too small to control; ask for help or choose ready-peeled garlic rather than forcing the cut.
- For chopping, hold the clove with a bridge grip clear of the blade's lengthways path and halve it slowly on the board. Put each half flat-face-down, hold with tucked fingertips and slice across into roughly 2 mm pieces, stopping before an awkward small end. Park the knife flat before arranging the slices. For smaller pieces, make a short stable pile, then controlled downward cuts while the other hand stays clear. Transfer roughly 2 to 3 mm pieces with a scraper or spoon, not fingers along the blade.
- A garlic press is an alternative for this sauce, not necessary equipment. With a compatible intact press and the hob still off, follow its maker's clove-size and peeling instructions, place the prepared clove in its basket, close and squeeze gently over the preparation bowl. Use the supplied blunt scraper to release garlic if the maker directs; do not scrape a cutting surface with fingers. Stop if it jams. Open, remove residue and wash according to its instructions after use. Pressed garlic still needs the gentle stage below.
- Park the knife, clear the skins, clean the board and wash hands before heating. Keep the prepared garlic beside the ready jug. The 2 teaspoons oil belong to the onion stage; do not add the passata lesson's separate teaspoon again.
Add garlic after the onion
- How to soften onions without burning themReach tender onion before the short garlic stage.
- Make a simple tomato sauce from passataComplete the measured sauce and its gentle simmer before tasting.
- Storage and reheating basicsKeep the original cooking time and earliest ingredient deadline.
- Follow the complete onion-softening method with the whole prepared onion and 2 teaspoons oil. Start medium-low, stir regularly and check a cooled thick piece for tenderness, often after 8 to 12 minutes rather than stopping at the first glossy edges. Use only its calm food-filled-pan water correction if needed.
- Instead of that lesson's serving finish, switch off and support the pan on its trivet with dry gloves. Let vigorous sizzling settle. This is a brief transition with everything already prepared, not a long warm holding period.
- Stir the prepared clove through the tender onion, then return the pan to low heat using its handle safely. Keep stirring across the base. When there is a gentle sizzle and a more noticeable garlic aroma, often around 30 seconds, proceed while the garlic is still mostly pale. Do not lean over the pan to sniff or wait for brown specks.
- Pour the prepared 250 g passata and 30 ml water close to the food-filled pan with your hand clear of splashes, then stir through. This wets an onion base with a small amount of dispersed fat, not a pan of plain smoking oil.
- Use medium-low only as needed to reach gentle bubbles, then keep a gentle uncovered simmer for about 10 to 15 minutes, stirring across the base every minute or two. Aim for tender onion and a sauce that coats the spoon yet flows. If too thick while otherwise cooking normally, switch off, let bubbles settle, add 15 ml from the sauce-water reserve, stir, then return to gentle heat; repeat only if needed within the reserve.
- Switch off and support the pan. Transfer a little with the cooking spoon to the sample cup, cool to comfortable tasting warmth and use a separate clean spoon. Serve the untouched sauce promptly with bread, or begin its cooling routine. An unexplained bitter taste is not a reason to add sugar automatically.
For lightly golden sliced garlic
- How to use hob heat without guessingPractise the pan, handle and trivet movement before heating.
- Do this on a separate attempt, not beside the first sauce. Prepare ONE peeled clove as above, halve lengthways and rest the flat halves down. Cut roughly 2 mm slices with tucked fingers, stopping at an unsafe tiny end. No mandoline is needed. Park the knife before gathering slices.
- Use a small 16 to 18 cm frying pan compatible with your hob, a coating-safe heatproof spoon, 2 teaspoons oil suitable for gentle frying, dry gloves, trivet, a clean heatproof plate and separate clean tasting spoon. Check the pan's instructions; this is a thin oil coating, not immersion or deep frying.
- Put oil and slices into the COOL pan and spread the slices in one layer with the spoon. Start low. Stay with the pan, gently turn or move slices so the same side does not sit still. Expect a gentle sizzle; violent bubbling or smoke is not the goal.
- Watch after the first minute and keep watching. The first faint gold at a few edges is enough, often within a few minutes but not at a guaranteed time. Switch off then. If safe to handle and there is no smoke, support the pan on the trivet with dry gloves.
- Lift slices with the spoon onto the standing heatproof plate immediately, taking as little oil as practical. Do not tilt and pour hot oil, use paper at a lit hob or wait for deep brown; the hot pan continues cooking. Let slices cool to comfortable tasting warmth. Taste a small piece with the separate spoon, not the oil-transfer spoon.
- Use the topping promptly: place a small cooled slice on ready-to-eat bread with a clean serving utensil. Leave remaining oil undisturbed until fully cool, then dispose of it as local waste guidance directs, not down the sink. This is a make-and-use topping, not a storage method for garlic oil.
If garlic burns
- Burnt flavour rescue: when to save it and when to stopFor a completed sauce, distinguish flavour rescue from unfinished cooking and unsafe storage.
Switch off if safely reachable. If oil smokes, leave the pan where it is to cool; do not carry it, add liquid or reach through smoke. If there are flames, do not move the pan, use water or tackle the fire. Switch off only if safe, get everyone out, close doors if safe and call 999. Do not investigate flavour during a fire.
For an ordinary non-smoking food pan with only a few over-coloured pieces, stop heating and let activity settle before supported handling. Remove those visible pieces with a suitable spoon only if this is straightforward. Taste a cooled sample of fully cooked food, never hot oil, to decide whether bitterness has spread.
If a small garlic-and-oil topping is burnt, let the whole pan cool, discard the failed garlic and fat, clean and dry the pan as its maker directs, then restart with a fresh clove and measured oil on lower heat. Do not preserve the failed oil. For an already finished sauce, use the burnt-flavour lesson's small sample and stop decision; masking with sugar is not dependable.
Use and store it appropriately
- Storage and reheating basicsKeep the original cooking time and earliest ingredient deadline.
- Softening butter and making a simple garlic butterFor a later task, learn its separate preparation and storage routine first.
Keep sound whole bulbs in a dry, ventilated place away from hob heat, following a packet's instructions. For peeled or chopped garlic, use a clean small lidded food container, label the preparation date, refrigerate promptly and plan same-day use for this exercise. Follow any shorter packet limit. Discard mouldy or suspect garlic rather than tasting it to decide.
Garlic left in oil creates a different storage hazard. Do not leave homemade garlic oil on the counter or assume cooking, lemon or a sealed jar makes it shelf-stable. This lesson does not preserve its oil. Commercial jars have their own label directions; they are not evidence that a homemade mixture can be stored the same way.
Cool and store only untouched finished sauce by its full lesson, retaining the earliest ingredient deadline. For a later garlic-butter task, follow the separate complete method before making and storing a batch; it is not an instruction to keep today's garlic slices in warm butter.
The useful checkpoint
Record the cut, starting heat and cue you used: for example chopped clove, low heat after tender onion, next liquid added while pale. For a topping, note when the first faint golden edges appeared and whether you lifted slices promptly.
A later attempt can change one variable, such as slightly larger pieces or lower heat, while keeping the same small quantities. Do not increase heat and change the cut at once, and do not deliberately scorch food to recreate the dark photograph. Recognising the earlier stopping point is the transferable skill.