
Meat And Poultry
Steak: browning, turning and resting
Build a crust, understand why turning more than once is allowed and keep doneness separate from the searing myth.
Before you begin
- How to use hob heat without guessingControl heat and stop the pan safely if it becomes too hot.
- Clean and set up your kitchen before cookingSeparate raw-contact tools, clean surfaces and wash hands at the right points.
- Kitchen thermometer basicsFind the sensing area and make a complete temperature-and-time check.
- Measuring accurately without stressUse an actual marked 5 ml measure, not an eating teaspoon.
- Thermometer cleaning and careHave the complete cleaning and food-contact disinfection routine ready before cooking.
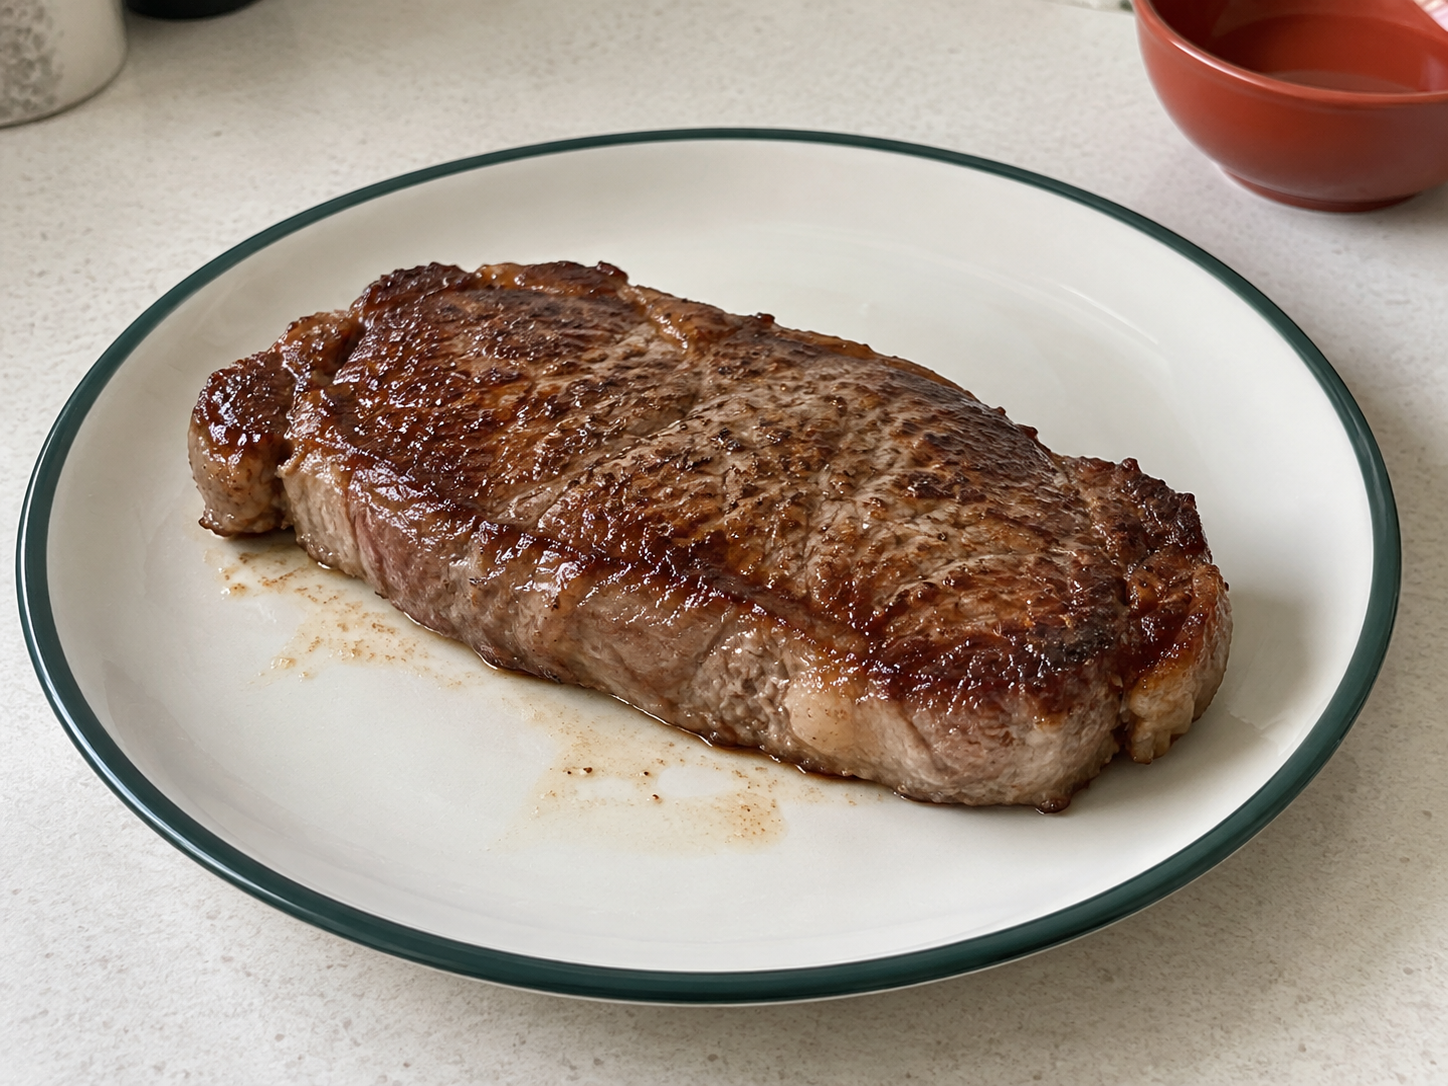
Browning adds flavour; it does not seal in juice
Searing means cooking a surface hot enough to develop brown colour and roasted flavour. The crust is not a waterproof seal. Steak still loses moisture as it cooks, and leaving it over high heat for longer generally drives out more. Use searing for flavour, then manage the centre deliberately.
There is also no rule that you may only turn a steak once. Controlled repeated turning can help it heat more evenly. The best approach is one you can manage with a suitable pan, steady heat and a clear doneness check.
This is a KINALO-authored first practice, not a physically tested recipe. The linked cooking demonstrations inform turning and resting, but their medium-rare timings, very hot pans, butter finishes and temperature targets are not instructions for this thorough-cooking exercise. Keep the actual pan and product directions first; no fixed cooking time or time saving is promised.
For a first attempt
- Storage and reheating basicsFinish a frozen steak's complete fridge thaw before this chilled-food method.
- How to use hob heat without guessingFind the correct ring, limits, handle direction and off control while cold.
- One intact boneless sirloin or rump beef steak sold for quick pan frying, around 180 to 250 g and about 2 cm thick, with its packet instructions. Keep chilled until preparation and within its use-by/after-opening limit. This walkthrough does not cover frozen centres, braising cuts, minute steaks or mechanically tenderised products; follow their own complete directions instead. A thawed steak must be fully fridge-defrosted and within its allowed thawed-use period.
- A sound dry frying pan large enough for the steak to lie flat without crowding, compatible with the hob and suitable for moderate browning. Know its heat/coating limits; use a lower setting if required. Have heat-safe coating-compatible cooking tongs, a separate clean serving pair, suitable cleaned food probe and its cleaning kit, seconds timer, two dry oven gloves, full-base stable trivet, utensil rests and two separate plates: raw preparation and clean serving.
- 5 ml plain cooking oil labelled suitable for frying, an actual marked 5 ml measuring spoon, small clean dish and disposable kitchen paper. Measure the oil before raw handling. Optional: a small pinch of salt and a few turns of pepper, portioned separately first; leave them out if unsure. No butter, extra hot-pan oil, water splash or baste is needed for this first attempt. Have a clean ordinary spoon for optional plate juices and, after it has cooled completely, used-fat disposal, plus a suitable closed waste container.
- For optional slicing: a clean stable board with non-slip mat, sharp suitable carving knife and fork. Set out bread on the clean plate for a simple first meal, plus normal eating cutlery. Check bread allergens and keep it away from raw juices. A second cooked side or gravy is optional: complete it beforehand using its own lesson and storage rules rather than trying two new hot jobs together.
- This first walkthrough aims for thorough cooking: at least 75 degrees C held continuously for 30 seconds in every potentially colder checked centre. It can be firmer than a pink steak. The separate doneness section explains why the intact-cut exception is not a universal lower safety target. Have shallow containers, lids and a date label ready only if saving untouched spare food.
Cook with control
- Kitchen thermometer basicsUse full centre depth, settled readings, the lowest relevant result and a continuous timed hold.
- Thermometer cleaning and careUse the complete cleaning/disinfection sequence, not a dirty towel wipe.
- Hot oil: shimmer, smoke and when to stopStop without carrying a smoking pan or adding fresh oil/water.
- With hob off, set pan, inward-pointing handle and full trivet where they can be reached without crossing a hot ring. Rehearse the empty pan lift and stable level landing using dry protection as the handle requires. Set out both tongs and rests, probe, timer, clean plate and bread before opening the meat. Know the smoke/fire response below.
- Pour the separately measured 5 ml oil into the cool dry pan and spread it across the base by gently tilting while cold, then set the pan level again. Put the bottle and measuring tools away from heat. Do not add extra oil to a smoking or fiercely hot pan.
- Open the chilled steak onto its separate raw-contact plate. Blot both broad surfaces gently with disposable kitchen paper; bin it and packaging. Do not wash the meat or trim it in your hand. Add the separately portioned optional salt/pepper, then wash and dry hands before touching clean controls or bread. Never return raw-contact seasoning to its container.
- Warm the oiled pan briefly over medium-high within its maker's limits, staying beside it; moderate heat is enough if the pan requires it. Do not wait indefinitely for smoke. Grip the steak securely with cooking tongs and lower its near edge close to the pan first, then lay the rest away from yourself. Keep your hand outside the rim and release only once it lies flat. Aim for an active manageable sizzle, not violent spitting.
- After about 1 minute, grip from the sides with the cooking tongs, lift only enough to turn, rotate and lay the opposite broad face down gently. Do not drop it, press it with your hand or splash fat. Continue turning every 30 to 60 seconds with a fresh reminder if helpful, watching for brown patches rather than black deposits. If stuck, allow a short further contact rather than wrenching it; lower heat if it darkens fast.
- Once broad faces have browned, reduce to medium or medium-low so the centre can cook without burning. Grip securely and hold an outside edge against the pan for about 20 to 30 seconds, then return it flat. Repeat for remaining edges, keeping hands above and outside the rim. Do not stand it upright unsupported. If that grip is unstable, stop and get help with the turning task, not bare fingers in the pan.
- Start the first centre check around 5 to 6 minutes total, earlier if the packet directs. This is only a checking reminder. Pause the ring and, with dry handle protection, land the calm non-smoking pan level on its trivet. Clean/disinfect the probe, check degrees C and insert from the steak's side so its whole sensing area lies in the thickest centre, clear of the pan and any thick fat seam. Steady with the cooking tongs if needed, not fingers. Wait for the display to settle; check another thick central area if potentially cooler.
- For this practice, every potentially cold checked area must remain at or above 75 degrees C for the full 30 seconds, measured continuously with the correctly positioned suitable probe. A brief 75 display or five-minute plate rest does not replace that hold. If the temperature is low or falls during the hold, clean/disinfect the probe, return the pan to gentle heat and restart the hold after further cooking. Set a fresh roughly 1-minute recheck reminder and keep turning gently between checks. Do not leave an instant-read probe in the pan as a cooking utensil.
- When checks pass, remove the probe, switch the ring fully off and leave the pan securely on its trivet. Use the separate clean serving tongs to transfer the steak to its clean plate. The cooking tongs and their rest stay separate until washed; do not serve with a tool that handled raw meat. Set a roughly 5-minute resting reminder, separate from the completed safety hold. Serve with the prepared bread, or follow the optional slicing steps below, and eat promptly. Start the spare-food cooling reminder from the end of cooking, not after dinner.
Slice a rested steak on a stable board
- Knife confidence: the safe claw gripLearn secure knife grip and safe pauses; this hot-food task uses a fork, not bare fingertips.
- Slicing is optional; you can eat the steak from its plate with normal knife and fork. For board slicing, complete the resting reminder and wait until you can work around it comfortably. Use the clean serving tongs to move it onto a clean stable board. Put the tongs aside. Never use the raw preparation plate or lift the meat balanced on a knife.
- Look for fine parallel muscle lines, not browned stripes, folds or grill marks. These are the grain. On sirloin the lines may be faint; do not poke or tear the meat to find them. Where visible, plan cuts across their direction, approximately a right angle. Different muscles in rump can have different directions. If you cannot identify the grain, thin controlled slices still complete the meal; record the texture without claiming a perfect cross-grain cut.
- Steady the meat with the fork in one hand, fingers safely behind its handle and well clear of the intended cut. Hold the knife by its handle in the other hand. Starting at an accessible end, use gentle short drawing strokes down through the meat to the board, aiming for about 5 mm slices. Stop the knife before repositioning the fork; never pull the knife towards the supporting hand, force a slippery piece or hold hot meat with fingers.
- Set the knife flat safely at the back of the board, fully supported with edge away from reach, before picking up food. Transfer slices with the clean tongs or fork to the plate. Thin cross-grain slices shorten fibres, but cannot reverse overcooking. Spoon only the clean plate's resting juices over the meal if wanted; do not substitute raw-plate juices or unverified pan liquid.
Choose doneness safely
- Meat temperatures: a practical UK cooking referenceDistinguish a thorough-cooking reference from a preference chart.
An intact whole beef steak can be pink inside when the entire outside has been properly cooked, according to the FSA. This exception does not cover burgers, poultry, pork, rolled or stuffed meat, or meat processed through the surface. For anyone needing thoroughly cooked food, or when the steak's processing is uncertain, use a thorough-cooking target such as 75 C for thirty seconds. Follow any product-specific advice.
A pink-centred preference is not a lower version of the universal thorough-cooking table. It relies on knowing that the steak is an appropriate intact whole cut and fully cooking every outside surface. This first exercise deliberately uses the thorough-cooking route. If a medical professional has advised extra food-safety precautions, follow that advice rather than using the pink-steak exception.
Common first-attempt problems
- Gravy thickness and lumpsMake a complete stock-based sauce separately.
Pale and wet can mean excess surface moisture, crowding or insufficient heat. Black outside and a cold centre means the surface heated too fiercely: stop adding high heat and continue gently once the pan is controlled. Toughness can come from the cut as well as degree of cooking. Thin cross-grain slices with a prepared sauce may make the meal easier to eat, but cannot undo moisture loss. Do not use a hand-press test as proof of safety.
If oil smokes, switch off only if you can reach the control safely, leave the pan stable where it is and let it cool fully; do not carry it, add water or pour in fresh oil. If there are flames, do not tackle or move the pan. Switch off only if safe, leave, close the door, warn others and call 999 from safety. A meal is not worth remaining beside a fire.
What to record
- Storage and reheating basicsUse shallow cooling, dated storage and a single thorough reheat.
Write down the steak thickness, pan, hob setting, turning pattern and the result. Do not rely on a hand-press test to calibrate safety or doneness. The next attempt becomes easier when you change one of those variables and can identify the effect.
For untouched spare steak, use clean serving tools to make small shallow portions, cool and refrigerate within one to two hours of finishing cooking, and label with that original date/time. Use within 48 hours, or a shorter applicable ingredient instruction, or freeze promptly using the complete storage lesson. A safely cooked/cooled/stored portion can be eaten cold; pink colour or pleasant smell is not proof of safe history. Reheat only once until steaming throughout, using the full hot-centre check rather than a quick surface warm.
Finish and reset the steak station
- Clean and set up your kitchen before cookingWash raw-contact tools and a visible knife separately, then disinfect as directed.
- Storage and reheating basicsFollow shallow cooling, original-clock labels and single-reheat history.
Check all used heat controls are off; recently used rings and the pan remain hot. Leave the stable pan on its trivet until fully cool, out of reach and with the handle away from the edge. Do not tip hot fat into the sink or bin. Once cool, spoon ordinary used fat into a suitable closed waste container according to local rules; wash the pan by its maker's method, not cold water poured into hot metal.
When cooking is safely finished, wash the raw plate, cooking tongs/rest and raw-contact surfaces with the full setup cleaning/disinfection routine. Wash and dry the visible knife separately and store securely. Clean/disinfect and dry the probe and its clean sheath by their own instructions. Wash hands after raw-contact cleanup before touching saved food. Label and chill any saved portion within its original cooling window; cleaning is not a reason to leave it out.
Sources and further reading
- Food Standards Agency: cooking food safely
- Food Standards Agency: chilling, freezing and defrosting
- Food Standards Scotland: raw meat, handwashing and separate serving tools
- The Food Lab: original searing-order comparison; a browned crust is not a moisture seal
- The Food Lab: original repeated-turning comparison, not a guaranteed time saving for this exercise
- The Food Lab: identifying muscle grain rather than grill marks before slicing
- Jamie Oliver: pan turning and plate resting; our thorough-cooking practice is a separate adaptation
- London Fire Brigade: leave safely rather than tackling or carrying a pan fire