
Baking Basics
Melting chocolate without scorching or seizing
Use a bowl over water
- How to use hob heat without guessingIdentify the correct ring, handle position and dry hot-equipment protection.
- Simmer versus boilRecognise occasional small bubbles without touching the water.
- With the hob off and equipment cold, add about 2 cm drinking water to the saucepan. Fit the empty dry bowl: it must sit level with its base CLEAR of the water. Use a different suitable pan/bowl pairing if it does not. Rehearse lifting the bowl with both gloves and setting it flat on the trivet. Resolve a poor grip before heat, not while steam is escaping.
- Remove the bowl and put the weighed chocolate in it. Put the water pan on a matching ring, handle away from the edge and other rings. Identify its heat and off controls. Warm at a moderate setting until occasional small bubbles rise, then reduce to low. Do not make a violent rolling boil.
- Set the bowl securely on the pan using the prepared gloves. Leave uncovered; a lid can collect water which drips into the chocolate. Watch continuously. As the edges soften, use the dry spoon to move softened chocolate towards the middle and gently across the base about every 30 seconds. Steady a hot rim through a dry glove, not bare fingers.
- If the bowl shifts, the grip is unsafe, water splashes or steam becomes fierce, switch off if safely accessible and leave the setup to cool before changing it. Do not lift a wobbling hot bowl to rearrange the pan. Do not leave the water pan unattended or allow it to boil dry.
- When most chocolate is liquid with only a few small softened pieces left, switch the ring off. With both gloves securely gripping the rim, lift just clear of the pan, keeping face and wrists back from steam, and set the bowl fully on the trivet before releasing it. Stir there until the remaining pieces melt.
- If genuinely firm pieces remain after off-heat stirring, return the bowl briefly over the still-hot water only if the setup remains stable and there is still water. Use low heat only if needed, then switch off and repeat the supported lift and stirring. Do not heat the chocolate until it bubbles.
- If the water needs replenishing, switch off and let the whole setup cool first. Remove the cooled bowl, add water to the cooled pan and retest the clearance before reheating. Never splash water into the bowl, pour into a dry overheated pan or top up past the bowl base.
- Leave the bowl supported for spoon transfers; there is no need to hold it in mid-air, wipe a hot wet base or pour it. Leave the pan water and ring to cool safely. Do not tip hot pan water out while trying to finish the drizzle.
Set up gentle heat, recognise the point to stop and understand why a few drops of water can change melted chocolate.
Before you begin
- How to use hob heat without guessingControl the water pan and turn the hob off safely.
- Clean and set up your kitchen before cookingPrepare and clean the food-contact surfaces and utensils.
- Measuring accurately without stressWeigh the 100 g batch and use a marked 5 ml teaspoon if making the optional sauce.
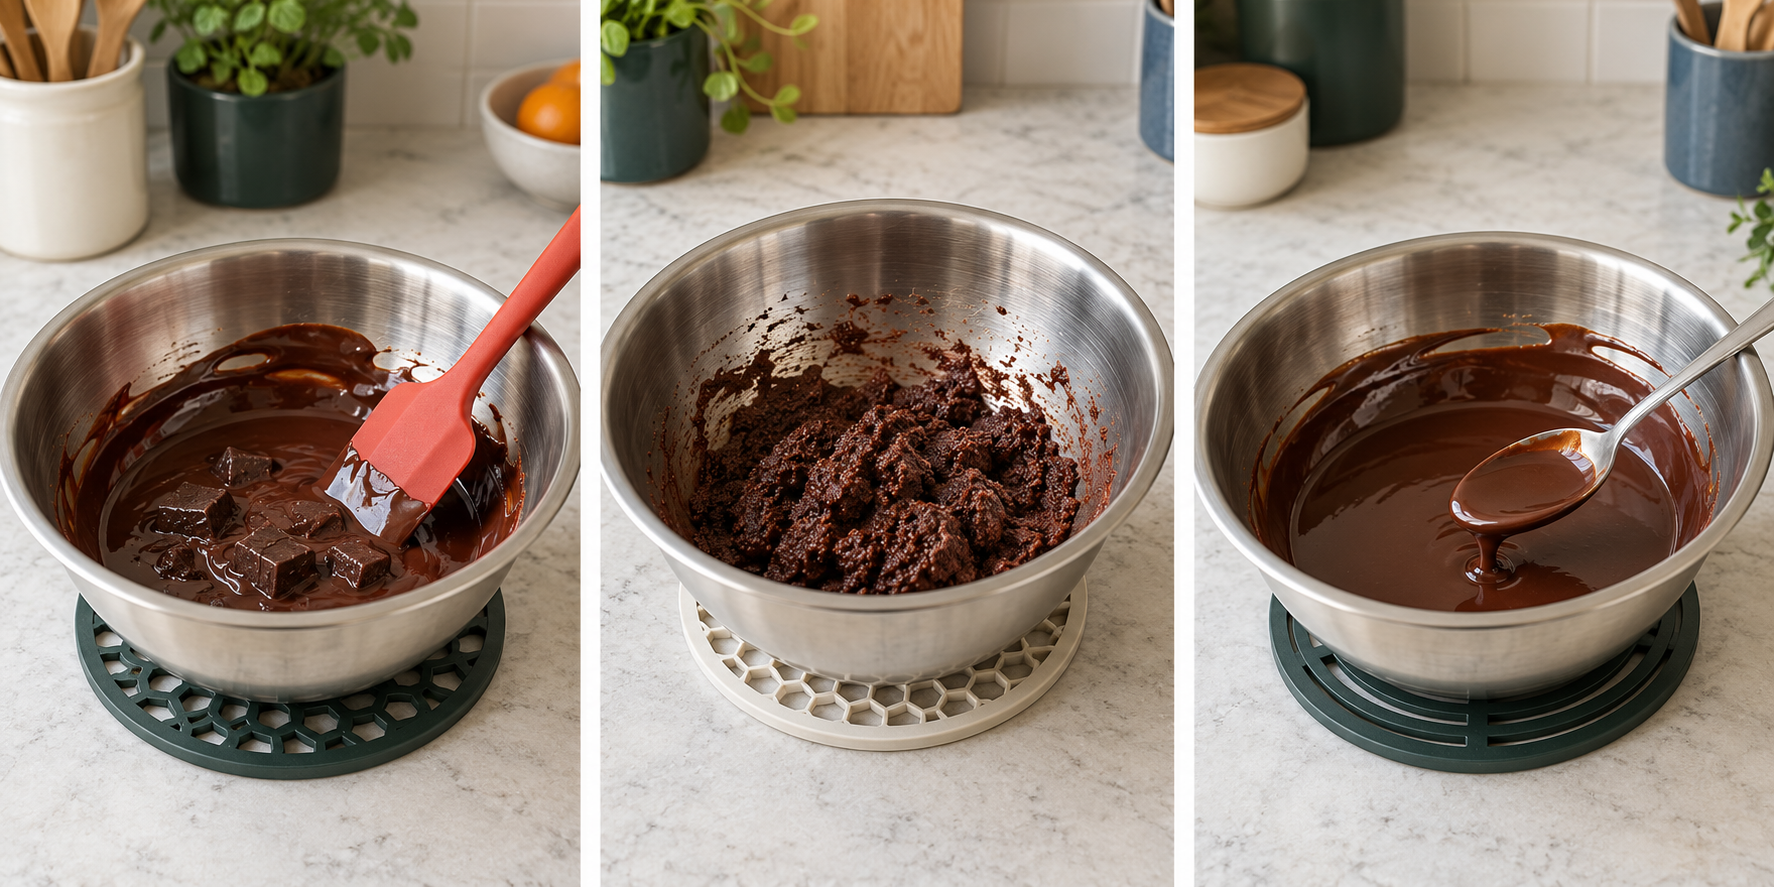
Gentle heat gives you time to notice
Chocolate can scorch on a hot pan before all its pieces melt. For this first task use 100 g plain dark chocolate and choose ONE complete method: a supported bowl over gently simmering water, or short microwave bursts. This is a KINALO practice, not a physically tested timing for every bowl or appliance. Milk, white, filled and very high-cocoa chocolate need their own method.
Melting gives chocolate a liquid texture for a simple drizzle. Tempering controls its crystals for a crisp, glossy set; that separate skill is not required here. A dull or slightly soft set is not automatically a mistake.
Set up before heating
- Measuring accurately without stressUse the liquid-measure instructions for each 5 ml water addition.
- 100 g plain unfilled dark chocolate, 55 to 70% cocoa. Read the actual ingredients/allergens and storage directions. Choose a bar that breaks by hand or baking pieces, not a thick slippery block needing a knife. Weigh with tare in a clean dry bowl and break into similar small pieces before heat.
- For the hob route: a small intact saucepan, a completely dry bowl whose maker permits use over simmering water, and a completely dry heat-safe spoon or spatula. A suitable stainless steel bowl is a possibility, not a requirement to use ordinary serving glass. Its base must stay above the water and its rim must support it securely without wobbling.
- Two dry heat-resistant oven gloves, a dry heatproof trivet large enough for the bowl, timer, clean spoon for serving, and a plate with a few ready-to-eat plain biscuits. Check biscuit allergens too. Keep the trivet and plate clear of the hot ring and raw-food work.
- If choosing the microwave instead: an intact dry microwave-safe bowl without metal or metallic decoration, fitting and rotating freely as its manual requires. The metal hob bowl NEVER goes in the microwave. No spoon remains inside while it heats.
- For the optional sauce rescue only: room-temperature drinking water in a clean jug, a marked 5 ml teaspoon measure and a separate clean filling spoon. Do not pour an uncontrolled jugful into the chocolate.
The microwave option
- Use a microwave and check for even heatingLearn the exact model controls before choosing the chocolate option.
- Use a microwave and check for even heatingCheck actual microwave suitability, not just appearance.
- Use this instead of the water-pan method. Put the same prepared 100 g chocolate in the dry microwave-safe bowl. From the manual identify microwave-only mode, cooking output, power, time, Start, pause/cancel and restart. About half power might be 400 W on an 800 W OUTPUT machine; the electrical input rating is not that setting. If the controls are unclear, use the linked control lesson before food or choose the complete hob route.
- Place the bowl as the manual directs, without spoon or metal. Select the reduced power and a first 20-second interval, check the display and start. Stay there. When it stops, open and use dry heat protection to land the bowl on the trivet before stirring softened edges and the bottom. This short interval is a cautious starting check, not a guaranteed total time.
- While most pieces remain firm, repeat short 20-second intervals at the same reduced power with supported stirring after each. Remove the spoon before returning the bowl. Enter only the next short interval, not a repeat of an old longer programme.
- As pieces soften, use only 5- to 10-second intervals with stirring. Stop with a few small softened pieces and stir smooth off heat. Do not chase bubbling, a fixed overall minute count or a long high-power blast. Cancel any remaining programme and leave the bowl supported.
- For smoke, sparks or an unusual appliance problem, stop heating; keep the door closed for smoke/fire and switch off only if safely accessible. For fire leave, close doors if safe and call 999. Do not restart a faulty appliance to rescue chocolate.
Recognise a change you cannot stir away
Burnt smell or scorched black specks mean stop and discard, not add liquid to hide it. A grainy thick paste after water entered otherwise unburnt chocolate is different: it may have seized. An illustration alone cannot establish which happened. Do not deliberately add a few drops as a compulsory first exercise.
For this optional 100 g dark-chocolate SAUCE rescue, leave the bowl supported off heat. Hold the clean marked 5 ml teaspoon level over a separate clean bowl and fill with drinking water using the filling spoon, then tip that measured water into the chocolate. Stir thoroughly and repeat one measured teaspoon at a time until smooth and spoonable. Keep count: six additions are 30 ml; nine are 45 ml. Depending on cocoa percentage, roughly 30 to 45 ml or more may be needed. It is not a universal formula or a promise that one teaspoon repairs it.
A little water can thicken chocolate; sufficient water can turn it into sauce. The newer linked chocolate-and-water article explains that distinction. It does not restore plain chocolate for tempering or preserve a cake recipe's quantities. Do not substitute this sauce for its specified plain melted chocolate.
If the mixture cools and hardens before loosening, use brief gentle warming by the complete chosen method, stirring frequently. The added drinking water is deliberately INSIDE the sauce, not extra water in a pan whose level must still remain clear of the bowl base. A burnt or unpleasant result can be discarded.
Use the practice batch
- Storage and reheating basicsUse shallow cooling, the original clock and labelled safe-history limits.
- Storage and reheating basicsFor a later sauce portion, follow the complete controlled pan method.
With heating off and the bowl supported, scoop a small spoonful of plain smooth chocolate. Move the spoon slowly a few centimetres above a biscuit on the standing plate. A second clean spoon can help it off. Let the chocolate cool comfortably before a bite and set before packing; do not put hot chocolate straight into your mouth. This finished drizzle needs no piping bag or cake recipe.
The water-added sauce can instead be spooned onto a biscuit to eat now, after that spoonful has cooled. Save only a clean unused portion. Cool spare sauce in a small shallow food-safe container, protected from contamination, and refrigerate within one to two hours from finishing. Label with original preparation time; use within 48 hours or freeze promptly. Retain any earlier ingredient limit.
For later sauce, use the linked full storage/reheating procedure, including suitable saucepan, stirring, safe handling and steaming-hot-throughout check; reheat a portion only once. It is not necessary to reheat a suitable freshly made drizzle. Plain chocolate with NO added liquid may set in a clean dry container and be stored by its original pack directions/date. Do not apply that plain-chocolate storage to the water-added sauce.
For a later cake, follow its exact amount and cooling stage. Warm chocolate can change egg or whipped mixtures. Confirm all heat controls are off, leave bowl/pan to cool fully, then wash tools as permitted. Once the water pan is fully cool, carry it level to a clear sink and pour away slowly, away from yourself. Dry equipment before storing.