
First Kitchen Skills
Blend food without splashes or unsafe shortcuts
Identify a hand or jug blender, practise with cold canned tomato, finish a measured sauce, and clean sharp parts while disconnected.
Before you begin
- Clean and set up your kitchen before cookingClean food-contact parts and keep controls and power dry.
- Open a can and use cooked beansUse only its safe can-opening steps for the tomato can, not bean draining or rinsing.
- Measuring accurately without stressUse scales and marked 15 ml tablespoons and 5 ml teaspoons.
- Make a simple tomato sauce from passataComplete the 250 g tomato, 5 ml oil and 30 ml water method.
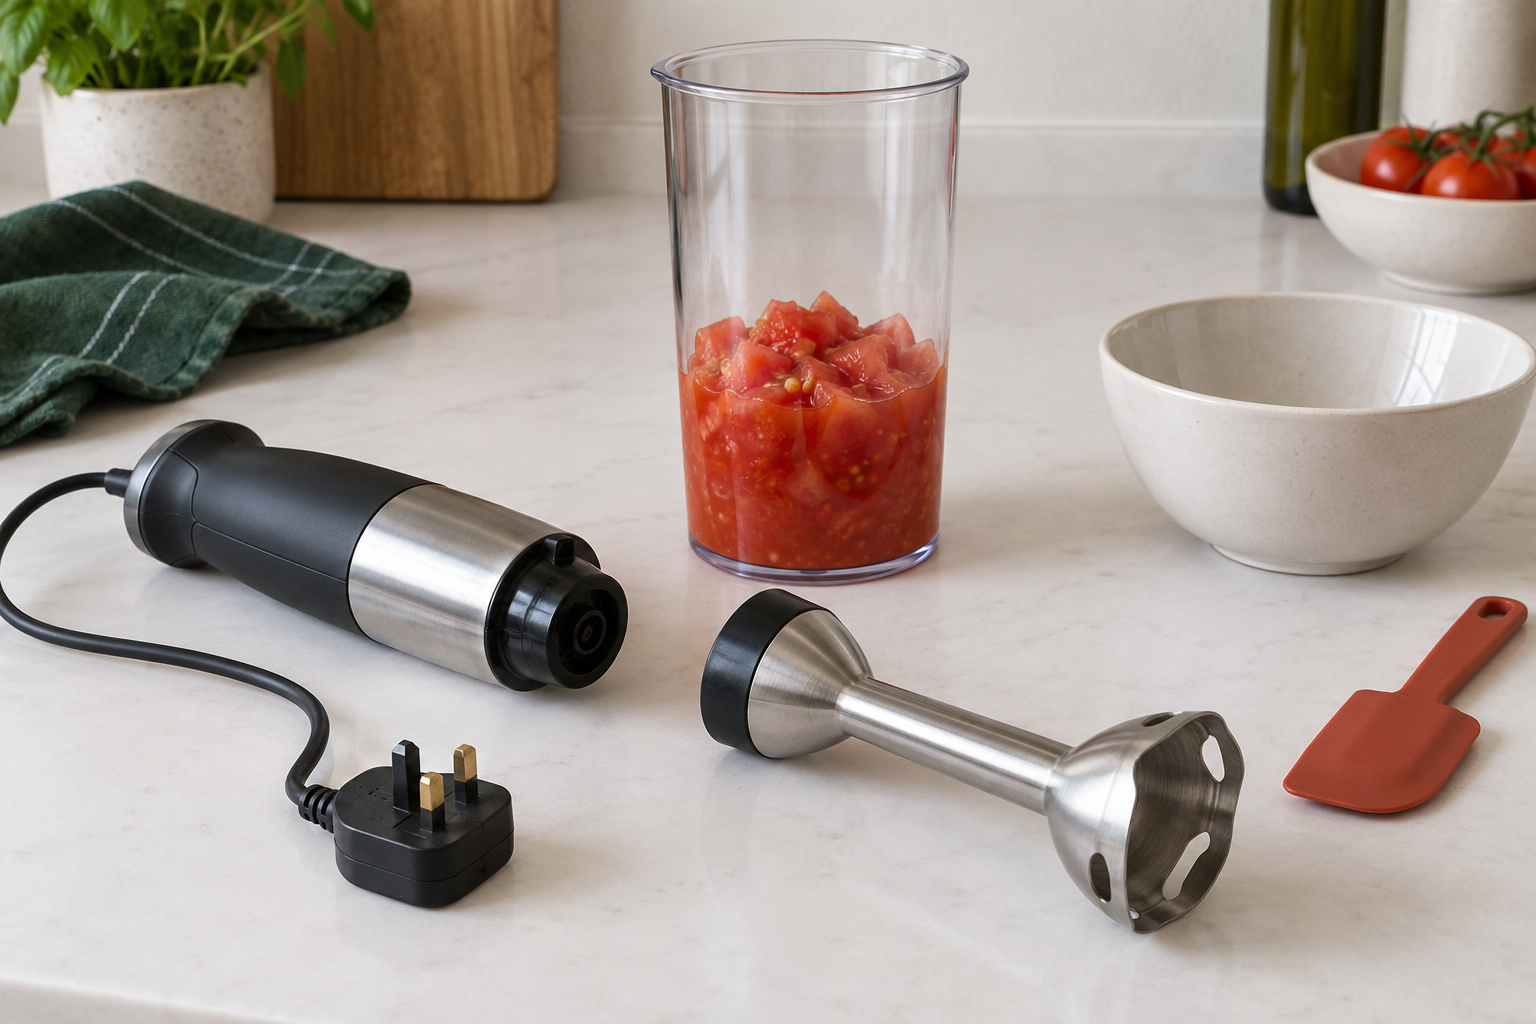
Identify the appliance before filling it
A hand blender has a powered handle and a shaft with a guarded cutting blade at the lower end. A jug blender holds food inside its own lidded vessel on a motor base. A screw-on personal blending cup, mini chopper, whisk and potato-masher attachment are different parts with different jobs. This first practice uses a corded hand-blender shaft in its approved tall beaker OR a full jug blender, not a portable or screw-on cup.
Find the exact model number on its label while disconnected and get its own manual. Before food is out, identify assembly/locking, approved foods and vessels, maximum and minimum fill, hand-blender immersion limit, controls, continuous run/rest limits, safe emptying and cleaning. If you cannot establish those things or an attachment is unsuitable, use the fork alternative below rather than guess. Example manuals are not instructions for every machine.
Use cold ingredients for the first practice. Hot liquid in a closed unsuitable container can build pressure and escape violently. Removing a cap, covering a lid with a tea towel or filling halfway does not grant permission. Even a jug or metal shaft may have limits. Inspect plug, cable, bowl, guard, seals and attachments as the maker directs: damage, missing parts, leaks or an insecure lock mean stop, not hold it together by hand.
Set up a cold tomato practice
- Use one intact freshly opened 400 g can of plain chopped tomatoes with ALL its juice, at a cold temperature permitted by the manual. This is an ingredient for cooking afterwards. Follow its label; do not taste it straight from the can simply because it looks cooked. If your room is warmer than the permitted cold limit, use safely refrigerated ingredients instead, not an undefined warm starting temperature.
- Use the linked can-opening routine with clean hands and a stable can, keeping fingers clear of the lid and cut rim. Empty into the approved beaker or assembled jug with a spoon, not fingers. Do not use the bean lesson's draining and rinsing steps: the tomato juice is needed for circulation. Dispose of the lid safely.
- Choose a beaker or jug with enough approved usable capacity for the whole 400 g plus the maker's headroom; grams are not millilitres or proof of fill. For a hand blender the food must cover the full blade guard while staying below the shaft's maximum immersion mark and motor joint. For a jug respect minimum liquid as well as maximum. Use smaller batches only if each still meets those limits; mix the completed batches with a spoon before weighing the sauce portion. If no permitted depth or capacity is possible, use the fork route instead of running a nearly empty head or adding unmeasured liquid.
- Have its instructions, scales, a receiving bowl holding at least 750 ml and a weighing bowl holding at least 500 ml, spoon, fork for the manual option, soft spatula suitable for its parts, clean tool rest and a covered food container for the unused tomato ready. For the cooked sauce stage also prepare the linked 1-litre saucepan, heat-safe spoon, 5 ml oil, 30 ml water, lid, dry gloves, trivet and tasting tools. Have ready-to-eat bread and a plate. Read both stages before beginning; leave onion, garlic and optional seasoning out of the first sauce.
- Choose a clear dry level counter away from the sink and hob. Leave base ventilation free; keep the cable away from heat, water and the counter edge. Disconnect from power before assembly or touching attachments. For a corded appliance, unplug with dry hands by its plug body, not pulling the cable. Never operate with a damaged cord, wet controls or an improvised vessel.
Use a hand blender in its beaker
- With the appliance unplugged, fit its approved blending shaft using the manual's locking method. Hold safe handle/shaft surfaces, never reach inside the blade guard. Check the attachment has locked and stand the filled approved beaker flat on the clear dry counter; do not hold it in mid-air.
- Lower the guarded end fully into the cold mixture while disconnected, with liquid below the maximum immersion line. Check that it will not overflow when the head displaces food. Stabilise the beaker at its safe upper outside or handle, with fingers outside the vessel, away from the blade end and control hand. Put the control hand on the powered handle, not the joint.
- With the shaft standing securely and controls released, keep it stable while plugging in with dry hands. If this setup requires you to let go of an unstable beaker or reach awkwardly across the food, unplug and reposition or get assistance; do not balance a sharp appliance precariously to reach a socket. Follow any safety release on the handle, then start at a permitted low setting. Begin with a brief burst, release and let all movement stop, then assess through the vessel.
- Keep the guard submerged during any running burst. Use only the gentle within-liquid movement your manual permits; never raise a running head into air or scrape a fragile vessel. Respect its run and rest limits, which are not the same on every motor. Stop before splashing, overflow or strain. If the head clings by suction, food will not circulate, the motor slows or the vessel shifts, release, wait and unplug before repositioning with a utensil; do not pull a running head free.
- Stop when large tomato pieces are broken into the texture you want; some seed and skin texture is normal. Release, wait for all motion to stop, then unplug before lifting the guard out low over the beaker. Place the shaft on its clean rest. Check with the spoon only while disconnected, not a fingertip near the blade. Repeat a short permitted burst only if still needed; do not run indefinitely to remove every fleck.
Use a jug blender instead
- Use the exact jug and matching blade/lid parts, with the power unplugged. Assemble and fit seals/blades as the manual directs, holding only designated safe surfaces. Some blades are fixed; some are a loose sharp assembly. Read the emptying method now, before the jug contains food. Add the cold tomatoes and juice inside its minimum and maximum limits, then secure and lock the correct lid and cap. Never run an open jug or bypass a safety lock.
- Put the jug onto the base in the maker's order, with dry outside surfaces, base standing flat and ventilation clear. Connect power with dry hands, choose a permitted low or pulse setting and run one brief burst. Stop, wait until the blades are still and inspect through the jug before repeating if needed. Observe the maker's maximum running and rest times; do not assume a one-minute button is suitable for every quantity.
- If tomato sticks or circulation stops, switch off, wait and unplug before opening. Use the soft spatula only as allowed, reaching down the wall while keeping clear of sharp edges. Never put a hand or utensil into a powered jug or use a spoon to defeat a lock. Refit and secure everything before reconnecting. A jam, damaged seal, leak or shaking base means stop and follow the troubleshooting instructions; do not force operation.
- When sufficiently smooth, switch off, wait and unplug. Remove the jug as directed. For a loose stacked blade, use the manual's designated handle and safe removal/landing method before pouring; for fixed blades, keep the unit assembled as directed. Never tip a loose sharp assembly towards the receiving bowl or grip cutting edges. If safe blade handling is unclear, stop and obtain a demonstration instead of improvising. Empty low into a supported clean bowl or saucepan using the approved method.
Finish the tomato practice
- Make a simple tomato sauce from passataComplete the 250 g tomato, 5 ml oil and 30 ml water method.
- Storage and reheating basicsKeep the original cooking time and earliest ingredient deadline.
- With the appliance unplugged, use its safe emptying method to put the blended tomato into a standing clean bowl. Stir the whole mixture so juice and thicker tomato are evenly distributed. Put the second clean bowl on the scales, zero the scales, and spoon 250 g into it. This is 250 g of blended tomato, not an assumed 250 ml or the full 400 g can.
- Put the unused blended tomato promptly into the clean covered food container, label with opening time and refrigerate. Use within the shorter of its after-opening instruction and 48 hours; do not store it in the opened can or a sealed blade-fitted blending cup. A little tomato left on a sharp assembly is not worth scraping with fingers.
- Transfer the measured 250 g into the cold sauce saucepan. Add the measured 5 ml oil and 30 ml water, stir and complete the linked passata lesson's gentle bubbling, full 10 to 15 minute simmer and cooled clean taste. There are no onion or garlic stages in that first sauce. Blended canned tomato may be thinner than strained passata or retain seed/skin flecks: stir often and simmer a little longer gently if needed, rather than hard-boiling to force it smooth.
- Finish when the sauce flows but coats a spoon and its cooked flavour suits; follow any longer can cooking instruction. Taste only a cooled clean sample after complete cooking. Switch off, support the pan and spoon onto the standing plate to eat with bread. Cool an untouched cooked portion promptly from its cooking finish and follow the original ingredient's earlier limit if shorter.
- Without a blender, empty the can and juice into a stable wide bowl holding at least 750 ml, press soft tomato pieces slowly with a fork while holding the bowl outside, and stir. Then weigh the same 250 g portion and complete the same sauce and storage stages. A chunkier sauce is a valid result; no powered appliance is required.
For soup or already cooked food
- Storage and reheating basicsKeep the original cooking time and earliest ingredient deadline.
- Storage and reheating basicsStir and check the whole portion, not a bubbling edge.
- Kitchen thermometer basicsPut the whole sensing area in the coldest thick centre and time the hold.
- How to rescue overcooked vegetablesChoose the complete manual-mash soup route for immediate serving.
For a later cold-blended soup, plan cooling before cooking. Use the full shallow-portion or suitable-container cold-water-bath routine, with clean utensils and bath water below the rim. Start the cooling reminder when the original cooking finishes; refrigerate within one to two hours for ordinary soup, or a shorter ingredient limit. Do not leave a deep hot pot for hours waiting for a cold-only appliance.
Blend only a safely cooled portion, within its existing storage deadline, using your exact vessel, liquid, fill and temperature limits. No visible steam or a cool outside is proof of the centre temperature. Use a clean food probe to check the stirred middle against a numerical appliance limit; otherwise keep cooling safely until its specified cold condition is met. Never put the probe in a running blender. Blend, empty and clean with the same disconnected handling as above. A too-thick mixture needs the maker's allowed liquid/circulation method, not endless motor time.
For hot serving after cold blending, use the complete saucepan reheating lesson: medium-low heat, stirring through the centre and across the base, until the entire portion is steaming hot. Reheat only once and serve now; blending does not restart a storage clock or allow another reheating of previously reheated vegetables. If dinner needs serving now, manual mashing off heat is the simpler route.
Hot pan blending is a separate later method only when the exact shaft, vessel and manual explicitly permit it. The pan must be supported away from active heat and its permitted temperature/immersion method followed in full. A metal shaft, a removable cap or another model's soup attachment does not authorise it. This cold practice does not teach hot use of an arbitrary attachment or a sealed personal cup.
Clear and clean while disconnected
- Release or switch off, wait for all movement to stop and unplug before clearing, emptying, changing an attachment or cleaning. Never put a fingertip inside a blade guard to find a blockage. Follow the maker's clearing method with a suitable utensil only while disconnected; do not force a jam or dismantle a sealed motor.
- Detach food-contact parts by their safe grip surfaces and locking method. Keep every sharp part visible on a clear surface, not hidden in a sink of water. Hold only its designed non-cutting surfaces while cleaning; use the maker-approved brush/cleaning method rather than wiping an edge with a fingertip. Do not assume all shafts, gearboxes, seals or blade units can go in the dishwasher.
- Wipe the motor/base as instructed, without immersing it, its plug or cable, and keep moisture out of controls and joints. Rinse only parts approved for rinsing and dry them fully. If a food-contact part cannot be cleaned safely, stop and get help rather than reaching blind into a guard.
- Store sharp parts in their protective cover or assembly as the maker directs, without loose blades or points where someone will reach. Keep the appliance unplugged and out of children's reach. A self-cleaning running-water cycle is not permission to improvise hot water, detergent or a lid setup; it needs its own explicit manual method.
Sources and further reading
- Braun: MultiQuick 9 type 4200 instructions, English pages 11 to 14 (example hand blender)
- Ninja: original BL490UK2 jug instructions, pages 8 to 9 (retailer-hosted manufacturer PDF)
- nutribullet: original quick safety guide for sealed containers (example design, PDF)
- Kenwood: model-dependent attachments and pan use
- Food Standards Agency: cooking and reheating food
- Food Standards Agency: chilling, freezing and defrosting