
Heat And Method
Tray spacing and oven airflow
Why crowded trays steam, why space matters in the oven, and how to arrange food for better browning.
Before you begin
- Use an oven: settings, preheating, shelves and the grillSet the mode and shelf while cold and practise safe hot-tray handling.
- Roasted vegetables: spacing, oil and donenessPrepare the measured carrot tray and follow its full time and tenderness checks.
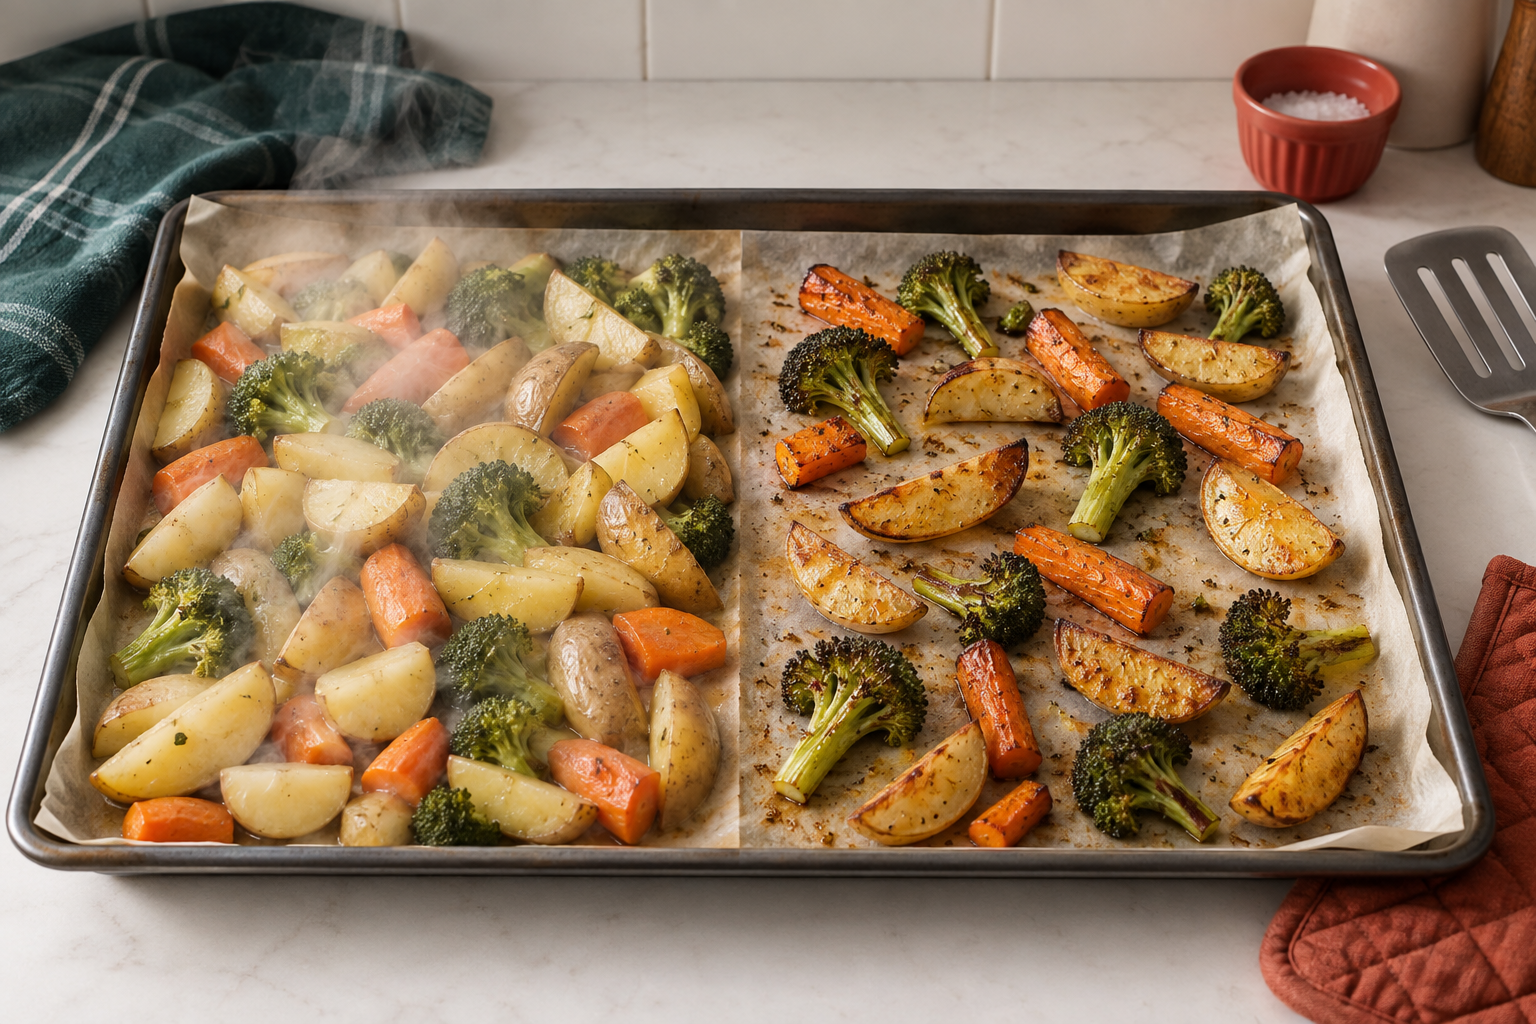
Hot air needs a route around the food
A tray covered with a deep pile of vegetables traps steam between the pieces. The food may soften, but the surfaces stay wet and browning slows. A single layer with small gaps gives moisture somewhere to escape and lets more of each piece contact hot air.
The tray shape matters too. Deep sides hold more moisture around food than a shallow rimmed tray. Choose a vessel suited to roasting rather than assuming any dish that fits the oven gives the same result.
Set up the oven and tray
- For the first practice, use the linked carrot lesson: 400 g carrots in pieces no thicker than about 2 cm, 1 tablespoon oil, and its 200 degrees C fan or 220 degrees C conventional setting. Read that complete method before switching on.
- Put a shelf near the middle while the oven is cool. Choose a rimmed oven-safe tray that leaves the manufacturer's required clearance at the walls and vents. Food must stay within the tray, not hang over its edge.
- Have a bowl, tablespoon measure, spoon, turner, fork, timer, dry oven gloves and a trivet large enough for the hot tray. Use one tray for the first attempt. Reduce the carrot quantity if it cannot fit in a single layer. Also have a clean testing/serving plate and the knife and board specified in the carrot lesson; carrots must be prepared before the oven task, not cut on hot metal.
- Coat the prepared carrot in the bowl by stirring and turning with the measured oil. Transfer to the tray and spread by hand or spoon while cold, with small gaps rather than a deep pile.
Arrange and check a roast
- Check the single layer before loading. Pieces should not overlap; a few millimetres of space between them gives steam a route out. Exact gaps matter less than avoiding a wet heap.
- Put the tray on the prepared shelf of the preheated oven and close the door. Set a timer for 15 minutes for this carrot example.
- At the reminder, stand back from the initial heat, then use dry gloves to put the tray on the trivet. Close the oven door again. Keep the tray on the trivet while turning pieces with the turner, not balanced half out of the oven.
- If one end is browning faster, use both protected hands to return the tray with its orientation reversed. Make sure it rests securely on the shelf. Keep watching for excessive darkening rather than compensating with a much hotter oven.
- Continue the carrot lesson's checks, commonly to a total of 25 to 35 minutes for this size. A fork should enter a thick centre easily and the surface should have browned patches rather than black edges. Remove ready pieces with the turner onto a clean plate if others need longer. At the finished endpoint, switch off, land the tray on its trivet and serve with the utensil onto supported plates. Leave hot metal to cool safely before cleaning.
- For a later two-tray cook, use the maker's permitted shelf arrangement and clearance, with two separate heatproof landing places and quantity-sized utensils. Remove and set down each tray in turn before swapping positions; never juggle two hot trays. Return one at a time with both protected hands. Check a thick piece on each tray and switch off when both are finished; do not assume they follow one timer or that a fan makes every shelf identical.
Avoid airflow shortcuts
Do not line the oven floor with foil or block vents to catch drips. Use an appropriate rimmed tray instead. Keep paper clear of heating elements and below its rated temperature. A fan helps move air but does not compensate for food stacked in a wet heap.
Keep raw meat and its juices from dripping onto vegetables or ready-to-eat food. Do not arrange an uncovered raw-chicken tray above food that will be served without a further thorough cook. For the spacing practice, keep the oven task vegetable-only.
Diagnose the result
Pale soft vegetables with liquid underneath suggest crowding or too much moisture. Dark thin edges with hard centres suggest pieces that are too large, uneven cuts or heat that is too high. Split the batch or change the size next time. Higher temperature alone will not reliably fix a crowded tray.
Practise with one ingredient
- Wok and batch cooking basicsLearn a bounded courgette-and-carrot pan method.
Record the carrot quantity that fit your actual tray, the piece size and the time to tenderness. For another vegetable, use a complete method for that ingredient rather than transferring the carrot timer unchanged. The pan-vegetable lesson gives a separate courgette practice. Browning and a fork test are observations you can reuse; one universal cooking time is not.