
Pantry And Ingredients
Making stock from bones and using pan juices
Turn suitable cooked bones into a small batch of stock, strain it safely and use roasting juices without carrying burnt flavours into the meal.
Before you begin
- How to use hob heat without guessingControl heat and stop the pan safely if it becomes too hot.
- Washing vegetables and keeping prep cleanWash and trim the carrot and optional celery.
- Storage and reheating basicsUse shallow cooling, dated storage and a single thorough reheat.
- Roast and spatchcock chicken: shape, heat and safe donenessFollow the complete roast and carving method; use a clean cooked carcass, never raw backbone substituted here.
- Measuring accurately without stressMeasure starting water, cold top-ups and the separate sauce stock.
- Colander, sieve and draining toolsComplete the cold supported-sieve rehearsal before a hot batch.
- Kitchen thermometer basicsUse the full sensing-area and continuous-hold check for the pan-juice sauce.
Stock is flavoured cooking liquid
- Roast and spatchcock chicken: shape, heat and safe donenessCook and carve the bird safely before collecting a clean carcass.
Stock is made by gently simmering bones or vegetables in water, then straining out the solids. It adds a savoury base to soup, sauce or rice. A stock cube is a useful alternative; homemade stock is worthwhile when you have suitable ingredients and time to cool it safely.
For the first practice use a clean carcass from a chicken safely roasted and carved in the same cooking session, before anybody eats from it. Remove usable meat for the meal or prompt chilled storage. Do not collect diners' bones. Prepare vegetables and straining equipment before roasting, or chill the carcass by the full storage routine instead of leaving it out while learning cuts. Start this same-session stock promptly after carving, within the original chicken's cooling window.
This small plain-stock lesson is a KINALO-authored adaptation, not a physically kitchen-tested recipe or the full published soup. We use cold starting water, fewer vegetables, a controlled two-hour simmer, small ladled transfers and cautious linked storage limits. The source's hot kettle pour, whole-pot sieve pour, soup additions and nutritional claims are not this task. Do not substitute raw bones or a raw backbone into a cooked-carcass method.
Make a manageable batch
- One small cooked chicken carcass from the same-session roast, with most useful meat removed. Choose a pot that holds it without forcing it against the rim. Do not hack hard bones with a small kitchen knife to make them fit.
- One medium peeled onion in roughly 2 cm pieces and one washed trimmed carrot in roughly 1 cm flat-face half-rounds. Optional: half a washed trimmed celery stick cut crosswise into 1 cm pieces; celery is an allergen. Have a stable board, suitable sharp knife and optional peeler. Prepare before raw poultry handling using the cuts below; no onion-softening or frying stage is needed. Leave salt out until the stock is used in a dish.
- About 1 to 1.5 litres drinking water, enough to cover the contents, in a saucepan around 3 to 4 litres with generous headroom. Have a spoon, measuring jug, timer and a lid to sit partly over the pan if needed.
- Heat-safe tongs, long-handled ladle, suitable fine heat-safe sieve, large heatproof receiving bowl(s), full-base trivets, dry handle protection, heatproof sieve landing plate and waste bowl, shallow food-safe cooling containers and a label/pen. Keep the mesh above collected liquid. Capacity is checked while cold; more manageable bowls are better than carrying an unwieldy full receiver.
Prepare the stock vegetables
- Knife confidence: the safe claw gripLearn the supported bridge and flat-face cut before using the claw.
- Boil and steam vegetables without guessingUse the full carrot splitting and half-round actions, with this stock's 1 cm size.
- Washing vegetables and keeping prep cleanWash produce, not raw poultry; keep cleaned produce away from raw-meat tools.
- Wash hands and stabilise the clean board. Wash and dry the carrot and optional celery by the produce lesson before peeling or cutting. Keep produce and ready-to-eat jobs separate from any raw-chicken tools. Have the washed ingredients in a separate bowl before starting the roast.
- Set the onion on its board. Use the knife lesson's bridge hold with fingers/thumb on opposite sides of the intended cut to halve it from tip to root. Lay each half flat-side down. Trim the tip, peel off the dry skin and remove the root end with fingers out of the blade path. With the claw hold, cut the supported half into roughly 2 cm strips, then crosswise into chunks. Do not use the smaller onion-softening dice or fry these chunks.
- Use the washed carrot's flat-face half-round preparation in the linked boiling lesson, but make roughly 1 cm pieces for this stock. Start with supported bridge-held lengthways halves, then flat face down and claw-held crosswise slices; stop rather than force a rolling hard carrot. A safely prepared carrot need not be peeled.
- For optional celery, separate the stalk from the bunch, rinse the groove to remove trapped grit, dry and trim any damaged/tough end on the board. Lay its broad stable side down and use the claw hold to cut crosswise about 1 cm apart. Leave the small last end if the hold becomes awkward. Put prepared pieces into the bowl, clear scraps and wash/dry the knife separately.
Simmer and strain
- Colander, sieve and draining toolsUse a supported sieve and manageable hot-liquid transfers.
- Storage and reheating basicsUse shallow cooling, dated storage and a single thorough reheat.
- Put the carcass and prepared vegetables into the saucepan and add water to cover, keeping several centimetres of space below the rim. If the carcass will not fit with headroom, choose a larger suitable pot or a smaller already separated portion; do not fill to overflowing.
- Bring the supported saucepan to a boil, keeping face and hands back, then reduce to small gentle bubbles rather than a violently rolling surface. If using the lid, leave a steam gap and lift the far edge away from yourself with dry protection to check. Remain nearby; set a first 20- to 30-minute reminder and a separate two-hour finish reminder. Do not leave the home or let the pan dry out.
- Simmer for about two hours, checking every 20 to 30 minutes that liquid still covers the contents and the pan remains safely below its rim. To top up, measure about 100 ml room-temperature drinking water in the supported jug, lower the heat and add slowly from close above the liquid with hands clear of steam. Allow the gentle simmer to return. No hot kettle pour is needed. If it smokes, boils dry or scorches, switch off safely and discard the affected batch; do not splash water onto a dry hot base.
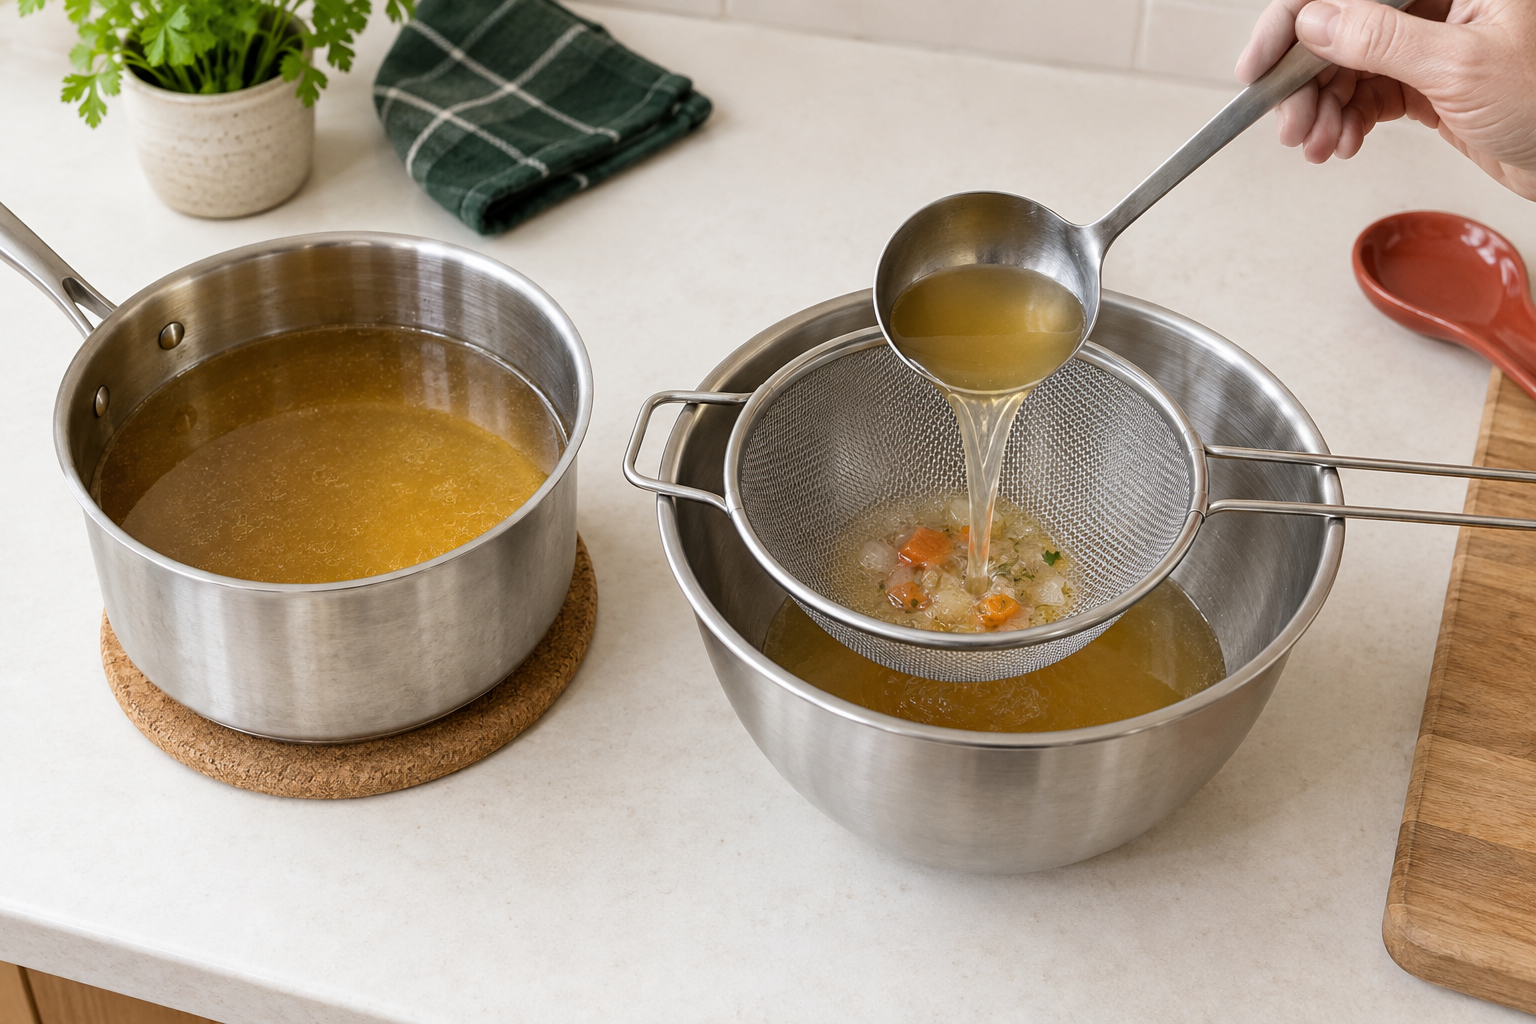
- Switch off and let the bubbling settle. Keep the pot on a stable trivet or switched-off ring. Lift large solids with tongs into a heatproof waste bowl without reaching into the liquid. Keep hands back and do not squeeze hot bones.
- With the receiving bowl fully supported on its trivet, check the sieve is still securely spanning its rim. Ladle small amounts low into the mesh; source pan stays supported. Watch both the bowl level and mesh. Stop before collected stock touches the mesh or the bowl approaches full; let retained liquid drip and use designed grips with dry protection to land the sieve on its heatproof plate. Replace with another prepared receiver, then refit the sieve securely. Never steady hot mesh with fingers or carry a bowl by the sieve. Leave awkward sediment behind.
- Start the stock-cooling reminder when the simmer finishes. Ladle into small shallow containers rather than refrigerating a deep stockpot. Use the storage lesson's suitable-container cold-water bath if needed, keeping water below the rim and out of food. Cool and refrigerate within one to two hours of stock finishing; cover when cooled and keep at 0 to 5 degrees C. Do not leave bones or a full bowl on the worktop all night.
- Label the stock name, stock finishing time and ORIGINAL CHICKEN cooking time, plus the earliest use deadline. For this fresh same-session route, our cautious deadline stays within 48 hours of the earlier chicken finishing, not a fresh 48 hours from stock simmering. For example, chicken finished Monday at 18:00 gives a Wednesday 18:00 latest refrigerator deadline, sooner if another limit applies. Freeze cooled useful portions promptly if not using within that window, leaving the container's expansion space. Follow the later-use section below.
Later carcasses and using the stock
- Storage and reheating basicsRetain the original cooling and reheating history while thawing.
- Gravy thickness and lumpsUse the exact prepared-stock quantity and complete continuous cooking method for a planned dish.
- Kitchen thermometer basicsStir the later dish, then hold the cleaned probe at its coldest centre for the full time.
A later stored carcass is a different starting history. Use only one that was cooled/refrigerated within one to two hours of its original cooking, kept at 0 to 5 degrees C and still within its original 48-hour or shorter limit. For a promptly frozen carcass, thaw fully in a leakproof container in the fridge and use within 24 hours of complete thawing and any shorter applicable limit. If the carcass was already reheated, left out too long, spoiled or its history is uncertain, do not use it. Boiling does not repair that history. For a refrigerated carcass, allow enough time to finish the two-hour simmer and immediate dish before the original use deadline; starting stock just before that deadline does not extend it. For safely promptly frozen material, freezing pauses refrigerated storage, but never repairs earlier unsafe handling or renews an already used reheating allowance.
For that properly chilled or thawed later carcass, apply the same preparation, controlled simmer and supported straining, but treat making stock as its one reheating occasion. Plan only what can be used immediately in a dish within this continuous hot cooking session; do not chill/freeze it for another later reheat. Read and prepare the complete meal before starting, for example the linked stock-only gravy. Do not start a new recipe from scratch while hot stock waits.
Stock made by our fresh same-session route may be cooled and stored by the preceding steps. Freeze within that original refrigerator window if keeping it longer; the dated freezer record is not a new permission for poor cooling or repeat reheating. Later thaw a frozen portion fully in the fridge and use within 24 hours of complete thawing, or a shorter applicable product instruction. A promptly frozen portion does not become unusable solely because the earlier calendar refrigerator deadline passed while frozen. Measure only the portion required by the complete chosen meal; for stock-only gravy use its exact 250 ml prepared-stock amount, not the batch. Heat while stirring and check the coldest stirred centre by the linked probe method: at least 75 degrees C continuously for 30 seconds or 70 degrees C for 2 minutes, sensing area immersed without touching the pan. This later heating is its one reheat: eat promptly, not another fridge/freezer-and-reheat cycle.
Do not sip hot stock to judge flavour or use a gelled texture as a safety test. A small sample needs the completed cooking checks, a clean separate spoon and comfortable cooling first. Unsalted stock can taste mild; season in the final dish rather than concentrating this pot indefinitely. Store or discard remainder by its real history, never a new date just because it was strained.
Pan juices are a different ingredient
Roasting juices contain water, fat and browned cooking deposits. For a small first sauce, have 150 ml prepared unsalted or low-salt stock, a small saucepan, spoon, ladle, heatproof jug and clean probe ready. Use juices from a freshly cooked roast, not a tray of uncertain history. Do not taste the juices before the sauce is thoroughly cooked.
After the fully cooked meat has been moved to its clean resting plate, put the roasting dish on a trivet and let vigorous bubbling settle. Use a spoon or ladle to move its loose liquid into the heatproof jug instead of tipping an unwieldy hot tray. Let visible fat collect at the top, then spoon off most of it into a heatproof waste bowl. Leave dark burnt material behind.
Make a small pan-juice sauce
- Stock cubes, stock pots and strengthMake a measured stock without doubling its salt strength.
- Gravy thickness and lumpsUse a cold slurry when the safely cooked sauce needs body.
- Kitchen thermometer basicsFind the sensing area and make a complete temperature-and-time check.
- For the simplest route, spoon the separated non-burnt juices into the small saucepan, add the 150 ml prepared stock and stir. This works even when the roasting dish is glass or ceramic, because that dish stays off the hob.
- To use browned deposits as well, first confirm the roasting pan is explicitly hob-safe. With it stable on the trivet, away from direct heat and no longer smoking or fiercely sizzling, slowly add about half the stock from close to the base. Keep back from steam. Never add liquid to smoking oil, and do not do this in hot glass or ceramic where thermal shock is a risk.
- For a permitted metal pan, put it on a suitable low hob heat and scrape gently with a surface-safe spoon to loosen brown, not black, deposits. That is deglazing. Use small spoon or ladle transfers to move the liquid into the saucepan, then add the remaining measured stock. Leave awkward residue rather than trying to pour a heavy hot tray.
- Stir the combined sauce while bringing it to a controlled simmer. Check the stirred sauce with the cleaned probe, fully immersing its sensing area without touching the pan. Meet at least 75 degrees C for 30 seconds, or 70 degrees C for 2 minutes. If too shallow for the probe, use a smaller saucepan rather than accepting the pan temperature. Keep it positioned safely for the full chosen time; if it drops below target, continue and restart that hold. Never leave a hand-held probe in a hot pan or accept an edge bubble as the centre reading. Clean/disinfect after checking.
- Only after the full cooking check, put a small spoonful onto a clean tasting spoon, let it cool comfortably and taste without returning the tasted spoon to the pan. If too strong, add one level 15 ml tablespoon drinking water and heat through again. For thickness, follow the linked gravy's measured cold cornflour slurry, not dry powder in hot liquid. Switch all used hob controls off, support the saucepan on its trivet and spoon/ladle into a clean supported serving jug with headroom. Serve promptly with the cooked meat; do not add unheated fresh tray juices after the final check.
Keep the flavour clean
Brown deposits can add roast flavour; black deposits add bitterness and should be discarded. Appearance cannot prove juices are safely cooked, which is why the sauce check comes before tasting. A stock may set like soft jelly when chilled because of gelatine. That can be normal, but it does not override its date, cooling or contamination history.
For this first pan sauce, make only what you will serve. If it contains previously cooked and refrigerated homemade stock, this heating is that stock's reheat: do not store it for another reheating cycle. Cool any genuinely fresh spare sauce promptly and retain the earliest relevant ingredient limit. Never pour fresh sauce into an older container and give the mixture a new date.
Check every used ring is off; pan, bowl and sieve may still be hot. Once comfortably cool, put strained solids and separated fat in suitable waste, not the sink. Wash the mesh on both sides by the full tool-care lesson, wash the pan/ladle and receiving bowls as permitted, clean food-contact surfaces, and clean/dry/store the probe. A hot pan must cool safely before washing or contact with cold water.
Sources and further reading
- Food Standards Agency: chilling, freezing and defrosting
- Food Standards Agency: cooking food safely
- Food Standards Scotland: raw poultry, handwashing and separate ready-to-eat preparation
- Good Food: cooked-carcass stock stage in chicken and sweetcorn soup; inspiration for our separate smaller plain-stock method