
Baking Basics
Bread dough: kneading, proving and recognising change
Mix and knead
- On the cold clean worktop, weigh the flour in the mixing bowl using tare. Weigh yeast and salt separately, transfer both, and stir through the flour. Tare a separate water vessel, add water gradually to 160 g, then pour into the flour. Scrape the bowl bottom/sides with the spoon until all flour joins a rough dough. Cover with room to expand and rest 10 minutes.
- Spread about 1 level teaspoon of spare flour thinly over the clean worktop. Tip out the dough and scrape the bowl with the spoon or scraper. No big dry flour pocket should remain. Keep unmeasured spare flour away from the dough and save any remaining measured dusting flour for later shaping.
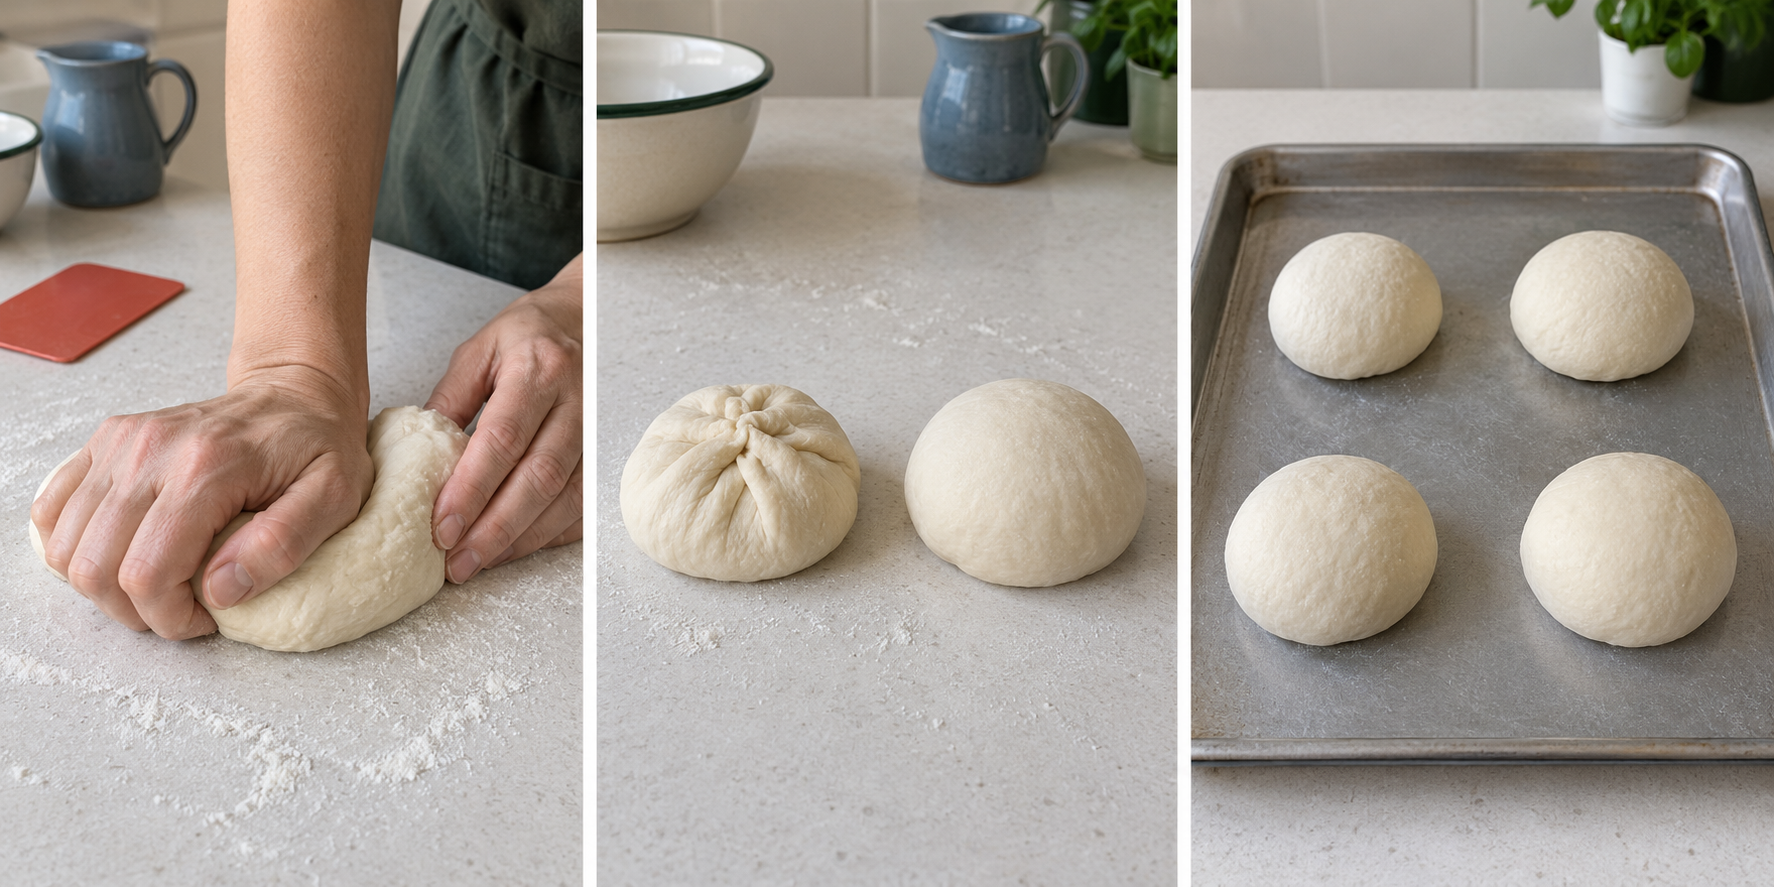
- With one hand lightly steadying the near dough edge, keep that hand out of the pushing path. Put the broad heel of the other palm, just above the wrist, on the dough and press forwards to stretch it a short distance. Do not flatten it into a long torn sheet or scrape hard against the worktop.
- Fold the stretched end back over the middle with your fingers, turn the dough about a quarter turn, and repeat push, fold, turn. Work for about 8 to 10 minutes as an initial guide, not a required exact count. Pause for discomfort; if needed cover it in the bowl while you rest. Gradual smoothness and springy resistance matter more than speed or force.
- For sticky dough, gather it with the scraper, cover and rest 5 minutes before continuing. If still needed, use only a little of the reserved light dusting. Do not add repeated handfuls until every trace of tackiness disappears; that changes the formula and can make dry rolls.
- Pinch off a small piece about the size of a small walnut, flatten it and let it relax 2 minutes. Gently draw opposite edges apart, turning to stretch a thin centre. Seeing light through some thin patches before tearing is a useful clue for this short-rise dough. If it tears immediately, return the piece and knead another 1 to 2 minutes before checking again. Do not taste it or treat a flawless paper-thin sheet as a compulsory contest.
Make a small yeast dough, feel how kneading changes it and learn why proving is judged by growth as well as time.
Before you begin
- Measuring accurately without stressUse scales, a marked jug and level measuring spoons.
- Use an oven: settings, preheating, shelves and the grillChoose the cooking function, preheat and move the hot tray safely.
- Clean and set up your kitchen before cookingPrepare and clean the food-contact surfaces and utensils.
What kneading and proving mean
Kneading repeatedly stretches and folds dough. In wheat bread this develops a gluten network which holds gas produced by yeast. Proving gives that dough time to expand before baking. Here the first rise happens in the bowl; the second happens after four rolls are shaped.
This plain four-roll KINALO practice is an authored teaching method, not a physically tested recipe. The published roll method linked below is a separate formula, not a claim that it tested our quantities or times. Gluten-free, rye, wholemeal and very wet doughs need their own instructions; do not substitute them into this first white-wheat practice.
For four small practice rolls
- Measuring accurately without stressZero each separate dish and stay within the actual scales' load limits.
- Oven dishes and bakeware are not all interchangeableConfirm actual tray/lining temperature permission before heating.
- 250 g strong white bread flour, 160 g room-temperature drinking water, 3 g instant fast-action yeast explicitly labelled for mixing directly into flour, and 5 g fine salt. No sugar, milk, egg or seeds are included. Use the actual yeast's storage/date and direct-mixing directions, not baking powder or yeast requiring a different activation.
- Check scale capacity, minimum load and readability in its instructions before starting. For the 3 g yeast choose a suitable fine scale reading in 0.1 g steps with minimum load no greater than 3 g; weigh yeast separately in a small dry tared dish, and salt separately too. A whole-gram display that jumps or ignores such a small addition is not a reliable way to measure it. If your tools cannot measure these amounts, choose a complete published packet-sized formula with suitable tools rather than guess a fraction of a sachet.
- 1 level marked teaspoon, 5 ml, suitable cooking oil for the bowl and non-stick covering, NOT an extra dough ingredient. Up to 1 marked tablespoon, 15 ml, spare flour is for light worktop dusting, not an automatic handful added to the mix. Have clean filling spoon and small oil dish, plus kitchen paper for the thin oil film.
- An intact mixing bowl holding at least 2 litres, mixing spoon, clean smooth food-preparation worktop, food-safe bowl cover with expansion room, dough scraper or blunt table knife, and a sturdy rimmed oven-safe metal tray. Use a thin oil film on the tray if its maker permits, reserving oil from the measured 5 ml, or fitted baking paper specifically permitted at the baking temperature, with no loose overhang. No grill mode.
- For the shaped dough, a clean roomy food-safe cover/container or loose food-safe wrap with a thin oil film, not a tight lid pressing on the rolls. Timer, two dry intact heat-resistant gloves, large dry trivet, heat-safe turner, cooling rack on a stable heatproof surface, clean plate and optional clean board/serrated bread knife. A cleaned suitable food probe is optional, not the main bread test.
- Allow roughly 3 to 4 hours, sometimes longer in a cool room, with checks during both rises. Check wheat and any other actual ingredient allergens. Never taste raw dough/flour; keep raw flour, hands and tools separate from finished food and clean them before serving.
Let the dough rise in its bowl
- Wipe a thin film of the measured oil inside the bowl using kitchen paper. Return the sample and gathered dough, turning it once to coat the outside lightly. Keep the rest of the 5 ml oil for suitable tray/cover films. Cover with expansion room so the dough does not dry out.
- Leave at ordinary room temperature away from direct heat, not on a radiator or in a switched-on oven. Note or photograph its STARTING volume. A mark outside a straight-sided bowl helps; twice the height in a sloping bowl does not necessarily mean twice the volume.
- Start a 1-hour check reminder. Look for roughly twice the original volume and a rounded airy appearance, not just a clock reading. It commonly takes 1 to 2 hours and can take longer in cool conditions. If clearly smaller, cover again and check after another 20 to 30 minutes rather than automatically shaping at an hour.
- While waiting at this no-heat pause, wash floury tools/hands and clean the raw-flour worktop. Prepare the clean raw-dough shaping area separately from the clean ready-to-eat plate/board. Do not blow flour into the air or handle finished food with unwashed floury hands.
Shape, prove and bake
- Prepare the cold tray with its permitted thin oil film or temperature-rated fitted paper. Lightly dust the clean worktop with the reserved flour only if needed. Tip out the risen dough and press gently with the palm to remove the largest air pockets. Do not knead vigorously again.
- Park the scraper or blunt table knife on the worktop and use it to divide the dough into four similar pieces. Their undusted starting weights are about 105 g each (418 g total before any deliberate adjustments). If weighing, use a suitable clean tared plate on capacity-checked scales. A small difference is acceptable; substantially different sizes bake differently.
- Take one piece. Press it into a thick disc, bring its top, bottom and two side edges towards the middle, then pinch the gathered joins together with fingertips. Turn it over so that seam lies underneath. Do not add filling or slash the surface for this first task.
- Loosely cup a hand around the round and draw it towards you a few centimetres against slight worktop resistance; turn it a little and repeat. Stop when the top is round and gently taut, before skin tears. If it only slides, brush away excess dusting rather than push hard. A slightly uneven round is still a useful practice.
- Place seam-side down on the prepared tray with at least 5 cm gaps. Repeat for four rolls. Rehearse carrying this actual loaded COLD tray with both gloves to the cold oven shelf and trivet before heating. Resolve grip, weight and route while cold.
- Cover the tray loosely with the clean roomy container/cover. Lightly oil wrap if needed to prevent sticking and allow growth; keep it away from the hob. Check after about 30 minutes, then every 10 to 15 minutes as it puffs. Around 30 to 60 minutes or longer is an estimate.
- Look for visibly larger puffy rounds. With a lightly floured fingertip gently press one about 5 mm: a dent easing back slowly supports readiness, immediate spring-back suggests more time, and a fragile collapsing surface suggests it went too far. Growth plus this clue matters; the photo, clock or one poke alone is not a certificate. Use the correction section if it collapses.
Bake, cool and check the centre
- Use an oven: settings, preheating, shelves and the grillFollow the full mode, shelf, indicator and supported loading routine.
- Use an oven: settings, preheating, shelves and the grillLand the tray before inspecting and turn heating off explicitly.
- Kitchen thermometer basicsUse only sensing/position/settling guidance for the optional bread check, not its meat threshold.
- Thermometer cleaning and careClean after a raw-centre check and before the next one.
- Bread storage: cupboard, fridge or freezer?For the optional serrated-knife route use stable board, distance and gentle sawing.
- As the rolls approach readiness, follow the full oven lesson: correct cold middle shelf, clear landing route, normal baking function, and actual preheat indicator. Choose 220 C CONVENTIONAL or 200 C FAN, not grill or both temperatures. Keep the covered tray outside the oven during preheat. If readiness precedes preheat, keep it covered nearby and watch it rather than use an unheated oven.
- Remove ALL wrap, cover/container and other non-oven items before loading. Recheck lining permission and no overhang. With both dry gloves, open and stand back from heat, carry the tray level, support it fully on the shelf and close the door. Set an 18-minute FIRST check from loading; around 18 to 22 minutes or longer is a guide, not tested doneness for every oven.
- At the reminder use both gloves to land the tray on the trivet and close the door before inspecting. Look for a golden, firm set surface and set sides, not soft pale dough. Use the turner under a roll on the landed tray to inspect its base; do not juggle hot bread for a hollow-sound test. Return for short 2- to 3-minute checks if still soft/pale, setting a fresh reminder.
- For an OPTIONAL clean probe check, keep the roll on the landed tray and steady with the turner, not bare fingers. Use the linked sensing/settling and care methods, approaching from the side into the centre without touching tray. A centre still below about 90 C suggests further baking here, but a higher reading does not establish a crusty roll's texture. Do not use a meat 75 C target or close a handheld probe in the oven.
- When the surface/sides/base are set, switch the heating function off as the manual directs. Leave the tray on its trivet and use the turner to move rolls to the stable cooling rack. Treat rack, tray and oven as hot. Leave at least about 30 minutes, longer if the centre remains very hot; do not enclose them warm.
- For a first centre check, transfer a cooled roll to the clean plate and gently break it open by hand only when comfortable to handle. Alternatively use the full linked cooled-bread knife procedure on a stable clean board; do not improvise a fast downward cut. The crumb, the inside of the bread, should be set with small air holes, not wet raw paste. Slight warmth or a dense crumb alone is not the same as raw dough. Never taste a raw-looking centre.
- If this fresh same-session bake has a clearly raw centre, return the rolls promptly on the tray to a fully preheated 200 C conventional or 180 C fan oven for 5-minute checks. Keep the opened test roll separate and use its exposed centre only as a clue; check another whole roll after cooling again. Use the same gloves/trivet/off routine. If already burnt, stop and discard that result rather than chase the centre through a black crust. This is not a rescue for bread left out overnight or unknown food history.
- Once comfortably cooled with set crumb, eat a plain piece. That finishes the task without butter, sandwich filling or another meal. Note the actual rise and bake results for next time. No image or authored timing substitutes for checking the bread you made.
Correct the problem you actually have
If the mixed dough is stiff/dry, first check whether water or flour was misweighed. Work in room-temperature drinking water one marked 5 ml teaspoon at a time only as needed to bring it together; record changes. For sticky dough use the short covered rest and scraper before more flour. Return to the mixing/kneading method, not a second unidentified recipe.
For no growth, check that it was compatible direct-mixing yeast, stored as directed and in date, and that the location is not very cold. Move to an ordinary moderate room away from direct heat and give another 30 to 60 minutes with checks. Do not pour hot water onto it or blindly mix in more yeast. If still no sign of growth after several hours in a moderate room, restart with fresh compatible yeast and verified weights.
If first-rise dough or shaped rolls have visibly collapsed, you may try ONE reshape during this same session: gently press out the largest gas pockets, divide again if needed, repeat edge-fold/seam-down shaping and cover. Watch the next rise in 10- to 15-minute checks, using growth and the light indentation clue, not another automatic full hour. It can be denser; discard an unpleasant failed result rather than endlessly warm and rework it.
Cool, store and finish the worktop
- Bread storage: cupboard, fridge or freezer?Use the full plain-bread wrapping, dated freezing and gentle thawing steps.
- Clean and set up your kitchen before cookingReset flour-contact equipment without contaminating finished bread.
Leave these PLAIN rolls until completely cool throughout before enclosing in a clean dry bread bag/container. Keep those for prompt use in a clean cool dry place, or freeze fresh suitable surplus in dated small portions using the linked bread method. Fully thaw plain portions by that method before eating; filled bread has separate chilling requirements.
Keep ingredient/allergen details and the baking/freezing dates. Mould is not staling: discard affected bread, do not cut a patch off or toast it as a safety repair. Do not use a guessed fixed number of counter days in a hot/humid kitchen.
Sweep/gather flour without blowing it, wash used dough bowl/tools and clean the raw-flour preparation area. Wash hands before handling cooled ready-to-eat bread. Keep the optional bread knife visible during separate careful cleaning, not hidden in sink water. Confirm heat controls are off; let tray/oven cool fully before permitted cleaning and wipe scales without immersing electronics.