
Knife And Prep
Caramelised onions: the slow route to sweetness
Learn the difference between softened and caramelised onions, control sticking and allow enough time for deep colour.
Before you begin
- How to dice an onion without stressUse the halve-and-peel steps; slice strips here instead of dicing.
- How to use hob heat without guessingUse gentle heat and lower it as the pan dries.
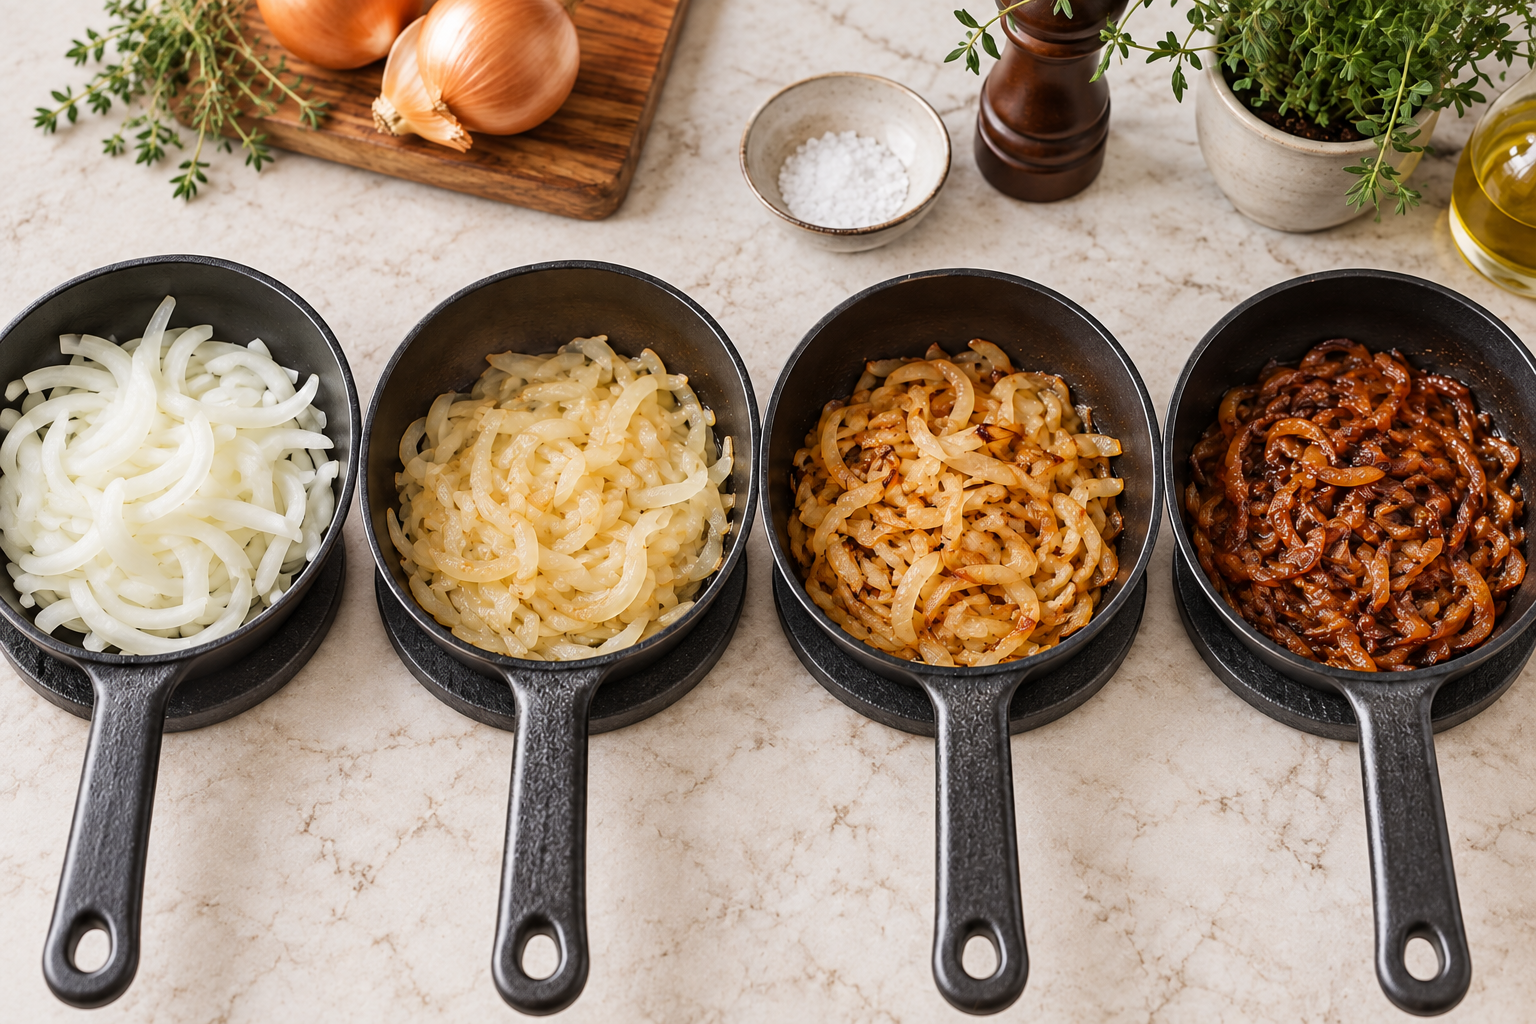
Give the onions enough time
Caramelised onions are cooked slowly until they are very soft and deeply golden brown. The flavour develops through several browning reactions as water evaporates. They are different from onions softened for ten minutes at the start of a sauce. For a first batch, allow roughly forty-five to sixty minutes, sometimes longer.
Increasing the heat does not turn a five-minute fry into the same result. It can darken the thin edges while the centres remain sharp and firm. Sugar is optional in some recipes; you do not need it to learn how onions change on their own.
What you need
- Two medium onions, roughly 300 g after peeling.
- 1 level tablespoon cooking oil, an optional small pinch of salt and about 100 ml drinking water in a small jug for occasional measured additions. Butter is not needed for this first batch.
- A wide heavy frying pan, around 24 cm across, a wooden or heat-safe silicone spoon, marked tablespoon measure, timer, trivet and a clean bowl for the finished onions. Choose a pan you can stir without spilling. Have dry oven gloves for a hot handle, a clean tasting teaspoon and three clean saucers for optional stage samples. Keep any spoon rest and cloth outside the heat zone.
- A stable board and a sharp knife. The pan needs room to stir the onions without spilling.
Slice and cook
- How to dice an onion without stressUse only the first safe halving/peeling procedure, then slice half-rings here.
- Stir, whisk, fold and turn: four different movementsSweep the base as the shrinking batch becomes easier to catch.
- Follow the exact halve-and-peel lesson first, leaving each peeled half flat-face down. Put the knife down to orient its stem end towards the first crosswise cut. Reset the claw grip and cut half-rings about 3 to 5 mm thick from stem towards root, moving the guide hand back between cuts. Stop before an awkward root end and discard it. Prepare all four halves before heating; do not slice a half held in the air.
- Warm the oil over medium-low heat. Add the onions and a small pinch of salt. Stir to coat; they should sizzle gently rather than spit violently.
- Cook for ten to fifteen minutes, stirring every few minutes, until the strips soften and lose volume. Lower the heat if the edges turn brown before the onions soften.
- Continue uncovered and stay nearby. Stir every few minutes at first, then about every 1 to 2 minutes as the onions become drier, and immediately if they catch. Move the spoon across the whole base and fold the edges into the centre. Lower the heat as needed; pale should gradually become golden then brown, not jump to black edges.
- If a calm food-filled pan becomes dry and brown deposits begin to catch, turn heat low and add 1 measured tablespoon (15 ml) drinking water slowly over the onions, keeping hands and face back from steam. Stir across the base to loosen brown, not black, deposits. Let it evaporate before another measured addition. Do not add water to a smoking/spitting oil pool or flames; stop heat and keep clear.
- Lift a small sample onto the clean teaspoon or saucer and let it cool before tasting. Stop when strips are soft throughout, deeply golden brown rather than black and sweet without burnt bitterness; 45 to 60 minutes is only a planning range. Switch the ring off, set the pan on its trivet with dry handle protection, and spoon the onion into the clean supported bowl. Let cookware cool safely before cleaning.
Read the pan as the batch shrinks
The same heat setting becomes stronger relative to a smaller, drier amount of food. You may need to lower it towards the end. Golden brown material on the pan can dissolve into the onions; black residue with an acrid smell is burnt. Leave blackened areas behind and move the usable onions to a clean pan if necessary. Switch the ring off before any transfer, and keep both pans supported; resume gentle heat only if the usable pieces still need cooking. Do not scrape black deposits into the new pan.
Use the result as a flavour ingredient
- Open a can and use cooked beansWarm ready-cooked beans before stirring in a little onion.
- Storage and reheating basicsCool, label and reheat without resetting the food history.
For a first use, add 1 measured tablespoon of the freshly cooked onions per portion to the reviewed warm cooked-bean method or a sandwich made with suitable ready-to-eat ingredients. Taste a cooled mixed mouthful before adding more. This method does not cook raw meat or dried beans, and the other recipe suggestions need their own cooking instructions.
For storage, put spare onions into shallow clean containers and cool promptly. Cover and refrigerate within one to two hours, then use within 48 hours or freeze promptly in small labelled portions. Reheat a portion only once until steaming throughout. Long cooking does not make a jar shelf-stable, and covering onions in oil does not make room-temperature storage safe.
Compare three stages
During your first batch, set aside a teaspoon at the soft, golden and deeply browned stages. Let each cool before tasting. Compare sweetness, remaining crunch and how much onion is left in the pan. This shows why recipes asking for caramelised onions need a different time allowance from recipes asking for softened onions.
Use separate clean saucers and taste each sample soon after it cools, rather than leaving the first one out until a much later meal. Do not tip tasted samples back into the pan. The full cooking time is a rough guide; the colour, softness and absence of burnt bitterness decide when to stop.