Charts And References
Oven temperatures and spoon measures for beginners
How to use oven temperature conversions and spoon measures without getting stuck when a recipe uses different units.
Before you begin
- Use an oven: settings, preheating, shelves and the grillIdentify actual functions and the Off control before the oven example.
- Measuring accurately without stressRead the correct units and actual spoon markings.
Read the unit before the number
- Use an oven: settings, preheating, shelves and the grillIdentify the actual cooking function and Off position.
An oven temperature says how hot the appliance is set to cook, not how hot the centre of the food must become. Conventional cooking, fan cooking, Fahrenheit and gas marks are different instructions. A hob dial marked 1 to 9 is not a gas-mark oven scale.
First write down the recipe wording, including C or F and whether it says fan. Find the actual oven model instructions for its cooking function and temperature scale. A fan-only defrost mode does not cook food. If the recipe or appliance instructions are unclear, resolve that before heating; do not choose whichever number seems familiar.
For a first no-heat exercise, use the complete cold oven-selection example below and the water-spoon comparison. A later real bake needs its whole food preparation, tray handling, time and finish checks. Choosing a number alone does not complete cooking.
Common oven equivalents
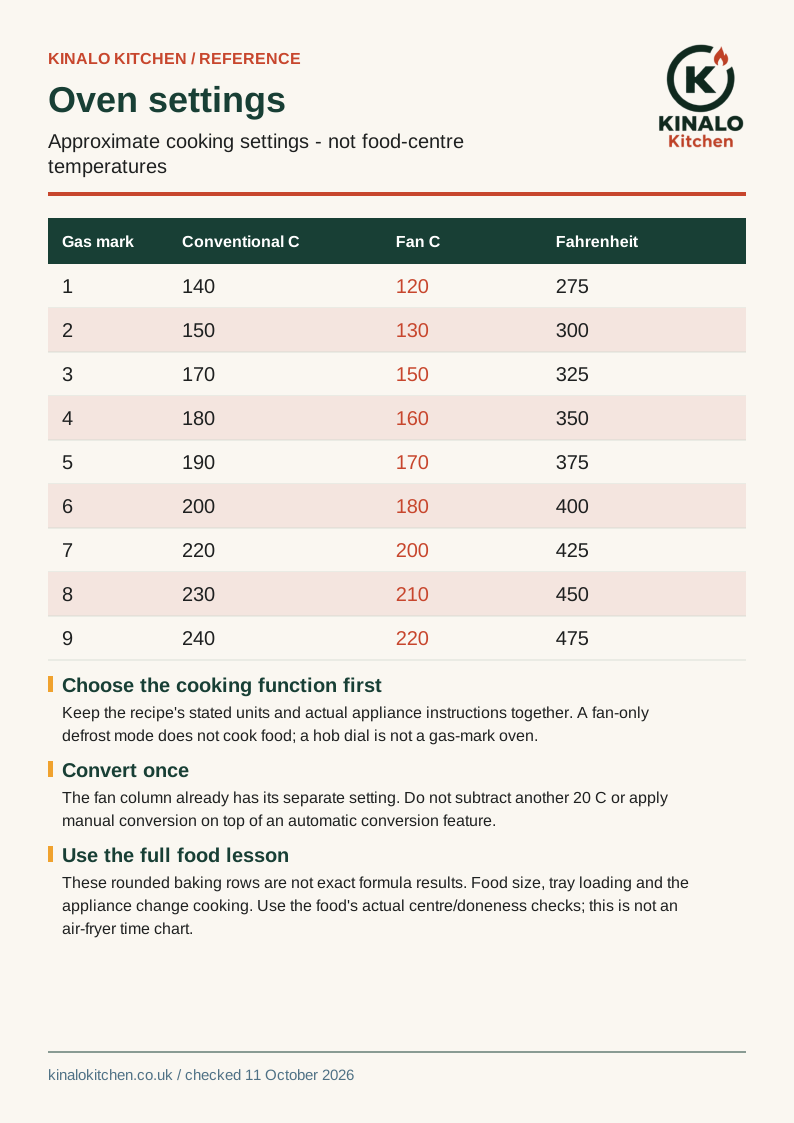
These rows follow the Doves Farm rounded baking reference. They are approximate cooking settings, not an exact temperature formula or permission to ignore a recipe. Different charts may round 325 F or 475 F differently; retain the stated recipe and appliance instructions instead of mixing rows from several charts.
The fan column is already the separate fan setting. Do not subtract another 20 C. Some recipes or ovens require a different adjustment; the chart is not a guaranteed rule for every cake, oven or air fryer.
| Gas mark | Conventional C | Fan C | Fahrenheit |
|---|---|---|---|
| 1 | 140 | 120 | 275 |
| 2 | 150 | 130 | 300 |
| 3 | 170 | 150 | 325 |
| 4 | 180 | 160 | 350 |
| 5 | 190 | 170 | 375 |
| 6 | 200 | 180 | 400 |
| 7 | 220 | 200 | 425 |
| 8 | 230 | 210 | 450 |
| 9 | 240 | 220 | 475 |
Convert an oven instruction once
- Use an oven: settings, preheating, shelves and the grillUse the full shelf and preheat procedure before a real bake.
- Roasted vegetables: spacing, oil and donenessUse the complete first carrot bake, not a temperature-only experiment.
- Meat temperatures: a practical UK cooking referenceFood-centre checks have their own temperature and holding time.
- Keep the oven cold and off. Have its exact manual, this chart, paper and pen. This first exercise chooses and records a setting; it does not require turning on an empty oven or preparing food.
- Take the example instruction "180 C conventional / 160 C fan". These are alternatives, not stages. On paper record the normal conventional function with 180 C, or the normal fan-cooking function with 160 C, according to the actual available mode.
- For a recipe explicitly giving 350 F conventional, find 350 in the Fahrenheit column, then read across THAT row: about 180 C conventional, 160 C fan, or gas mark 4. Choose one matching your appliance and check whether the actual recipe and maker allow that change. Do not set a Celsius dial to 350.
- Find the matching mode, temperature control and Off position in the cold appliance manual. If it has automatic conversion, read that feature before applying a manual conversion as well. Do not turn controls merely to test whether an element feels hot.
- Write the original instruction, chosen function and chosen setting together. You have completed the no-heat selection task. Put the reference beside your cooking notes, not inside an oven, above a flame or over a ventilation opening.
- For a later heated example, follow the complete carrot-roasting lesson. Its 220 C conventional / 200 C fan pair is already converted. Use its 400 g fresh carrots and 15 ml oil, suitable tray, cold loaded-weight rehearsal, two dry gloves, trivet, timer and checking utensil; then follow its full preparation, preheat, loading, early checks, soft-centre endpoint, switch-off, serving and storage method. The conversion does not replace those steps.
Metric measuring spoons
- Measuring accurately without stressUse the actual measure markings and dry-spoon levelling.
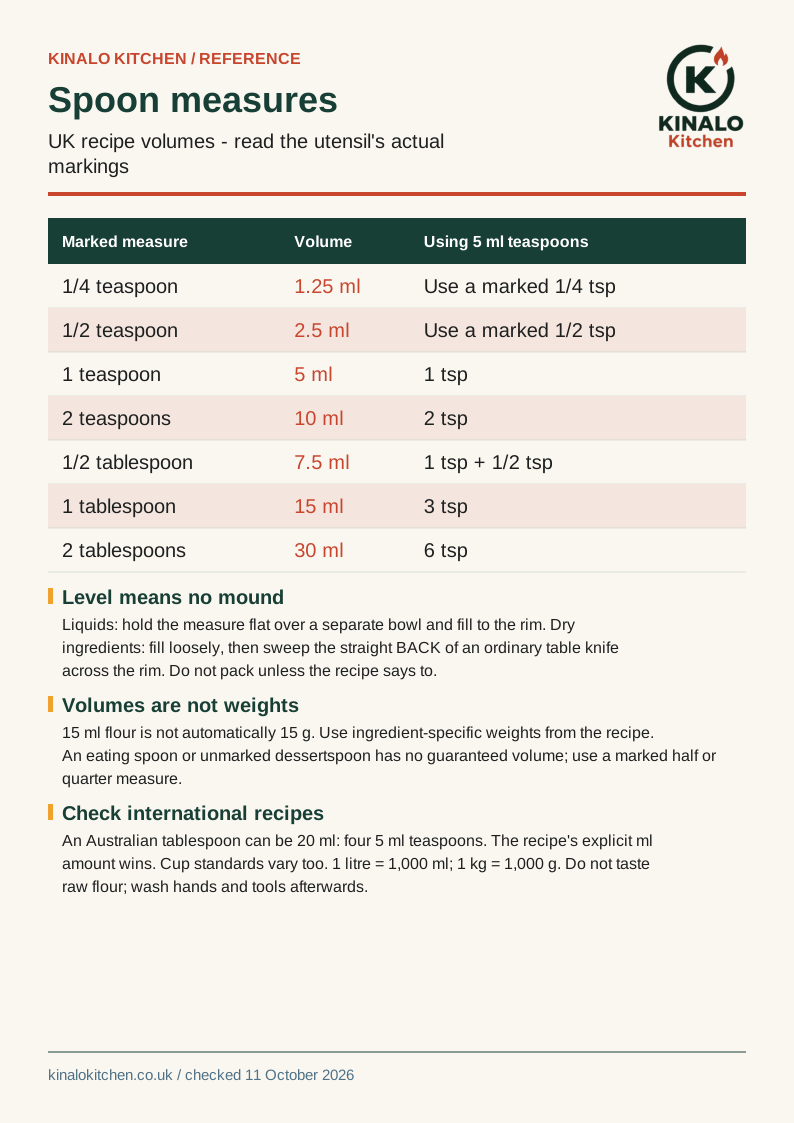
Use the volume printed on a measuring utensil. In these UK examples tsp means a 5 ml teaspoon measure and tbsp means a 15 ml tablespoon measure. Eating cutlery and an unmarked dessertspoon do not have a guaranteed volume.
For liquids, hold the measure flat over a separate bowl, fill to its rim without spilling and transfer carefully. For dry ingredients, use a clean dry measure and the straight BACK of an ordinary table knife to remove the mound; do not pack it down unless the recipe requires it. Half a spoon by eye is not a marked half measure.
These are volumes. Fifteen ml flour is not automatically 15 g, and the same spoon volume of honey, oil and flour has different weights. Keep a recipe given in grams in grams.
| Marked measure | Volume | Using 5 ml teaspoons |
|---|---|---|
| 1/4 teaspoon | 1.25 ml | Use a marked 1/4 tsp |
| 1/2 teaspoon | 2.5 ml | Use a marked 1/2 tsp |
| 1 teaspoon | 5 ml | 1 tsp |
| 2 teaspoons | 10 ml | 2 tsp |
| 1/2 tablespoon | 7.5 ml | 1 tsp + 1/2 tsp |
| 1 tablespoon | 15 ml | 3 tsp |
| 2 tablespoons | 30 ml | 6 tsp |
International measures need care
Check the recipe author and the utensil volume. Australian tablespoon measures can be 20 ml, so an instruction for that measure is four 5 ml teaspoons, not this chart's three. An Australian author may instead explicitly specify 15 ml; the written volume wins.
Cups also use different standards, and a cup of flour is not a cup of water in grams. Use the recipe's supplied weights or its own ingredient-specific conversion. Do not combine an arbitrary cup table with a spoon table and assume the original baking ratios survived.
Useful arithmetic for metric units: 1 litre = 1,000 ml and 1 kg = 1,000 g. These relationships do not turn a volume into a weight.
A quick practice
- Clean and set up your kitchen before cookingPrepare clean food-contact tools and finish the worktop reset.
- Measuring accurately without stressCompare with the separate tare/volume exercise.
- Prepare a clean level worktop, clean dry marked 5 ml and 15 ml measuring spoons, two identical small cups, a clean bowl to catch spills, a small jug of room-temperature drinking water and a clean cloth. No hob, oven or raw flour is needed for the first task.
- Hold the 5 ml measure flat above the spill bowl, with fingers on its handle, not in its cup. Pour slowly until water is level with the rim. Transfer into the first standing cup without spilling. Repeat until it contains three complete spoonfuls.
- Fill the 15 ml measure in the same way and empty it once into the second standing cup. Compare the levels with both cups standing on the worktop. With identical cups and no spills, they should match. If they do not, empty and retry carefully; do not adjust the printed measure volumes to fit a spilled attempt.
- For a separate dry-measure exercise, set out a little plain flour, an extra filling spoon, a dry 5 ml measure, an ordinary table knife and a bowl. Wash hands, spoon flour loosely into the measure above the bowl, then sweep the straight back of the knife gently across the rim away from fingers. The bowl catches the excess. Do not pack, shake hard or taste raw flour.
- The flour exercise shows a level volume, not a known flour weight. Discard the small practice flour rather than returning handled/spilled powder to the packet. Wash and dry the cups, measures, bowl, jug and table knife, remove flour and water with a suitable damp cleaning cloth, and leave the worktop dry. Wash and dry hands after handling flour and cleanup. Keep the labelled measuring set together.
Keep reference and judgement together
- Tray spacing and oven airflowPlan the actual food layer and hot-tray handling.
- Meat temperatures: a practical UK cooking referenceUse the separate food-centre reference, not the oven number.
The downloadable two-page A4 PDF has one oven page and one spoon page. Print at actual size or fit to paper; the values are text, not a scale you must measure with a ruler. Keep the recipe's stated units and your own appliance notes alongside it.
Tray size, food thickness, loading and the actual appliance still change cooking. An early colour check can show excessive browning; it cannot certify a raw meat centre. Use the linked food lesson and its full endpoint before serving.
Air fryers need their own appliance and recipe method. This oven chart does not provide a universal time reduction, basket permission or safe internal food temperature.