
Eggs
Fried eggs: six styles and what to look for
Sunny side up, over easy, over medium, over hard, crispy-edge and basted fried eggs explained for complete beginners.
Before you begin
- How to use hob heat without guessingFind the ring control and adjust the heat as the food changes.
- Crack an egg and beat it with a forkOpen the egg into a cup and remove shell fragments.
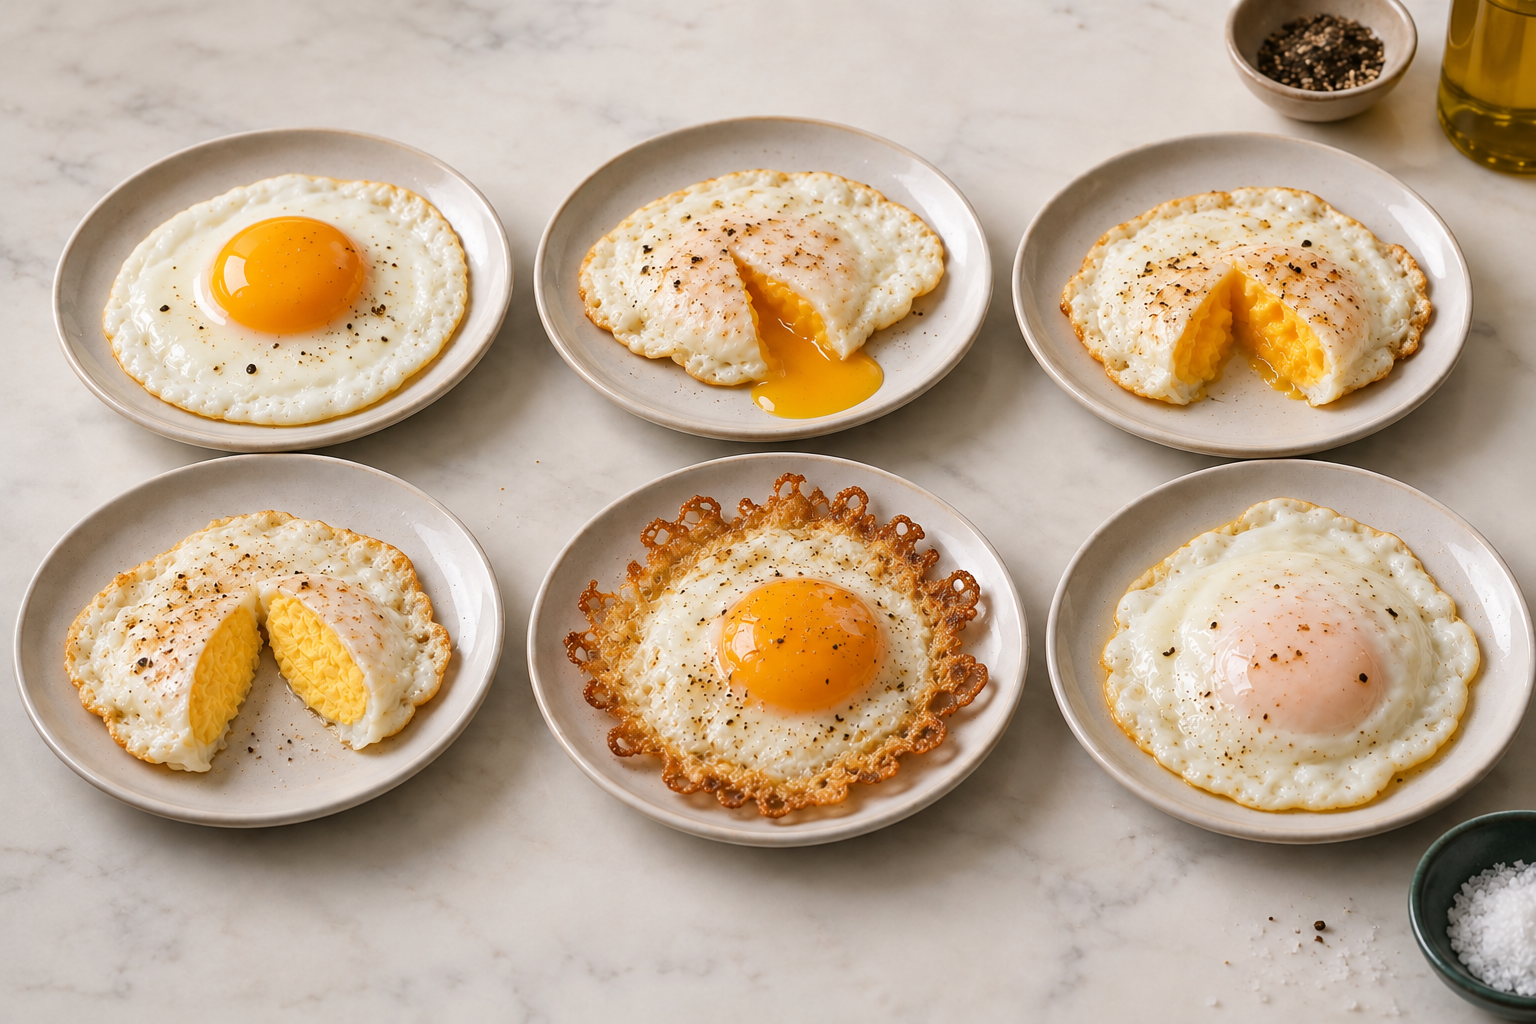
Choose a style before heating the pan
A fried egg can have a runny, thick or firm yolk and a pale or crisp edge. The style changes the heat and finishing method. Start with one egg so you can focus on how the white changes from clear and slippery to opaque and set. An opaque surface is a texture cue, not a substitute for choosing eggs suitable for the degree of cooking.
Choose just one method for this attempt, not six eggs at once. If you need a fully cooked egg, start with over hard. Sunny side up and crispy-edge describe appearance, not a promise of a firm centre; a basted cap can hide a soft yolk. A plain slice of ready-sliced bread avoids managing a toaster at the same time.
Choose eggs for the result you want
- Egg freshness, storage and separating yolksIdentify the assurance mark before selecting a soft style.
Choose hen eggs within their best-before date for this first practice. A runny or lightly cooked result needs British Lion or Laid in Britain assurance; if unsure, fully cook both white and yolk. For severe immune suppression with a medically supervised diet, follow the clinical team's advice instead. Other egg species need thorough cooking.
For one egg
- Stir, whisk, fold and turn: four different movementsRehearse turning before using a hot pan.
- One suitable hen egg and an intact hob-compatible non-stick pan about 20 cm across. For the gentle method use 1 measured teaspoon (5 ml) oil or 5 g butter. Egg is an allergen; butter also contains milk. Use suitable ingredients for the person eating it.
- A clean checking cup, clean teaspoon for shell fragments, broad flexible heat-safe turner approved for the pan coating, timer, clean serving plate, fork for checking the cooked centre, dry oven gloves and heatproof trivet. A fitted heat-safe lid with a secure knob is needed for the covered finish; have a clear heatproof place for it. No cloth or glove rests beside a hot ring.
- With the hob still off, follow the cracking lesson to check the egg in the cup without breaking its yolk. Remove shells, clean raw spills and wash and dry hands before touching clean tools and controls. Put the serving plate on the counter beside the trivet, away from the ring. Do not hold the plate while also controlling the pan and turner.
- Practise a low turn with bread in a cold pan using the linked movement exercise if flipping is unfamiliar. Then warm the pan with its measured fat on a matching ring at medium-low, handle safely turned in away from other rings. Butter should melt without browning; oil should spread without smoking. Prepare the egg before heating, and stay beside the pan.
Sunny side up: cook without turning
- Boiled eggs: soft, jammy and hardFinish a just-cooked egg whose opened centre needs further cooking.
- Hold the checking cup by its outside, keeping fingers back from the pan. Bring its lip close above the pan and tip slowly so the egg slides into the fat, rather than dropping from a height. Put the cup down in the raw-tool area. Do not reach across the hot ring.
- Let the egg cook gently without stirring or breaking the yolk. Begin checking at around 2 minutes; about 2 to 4 minutes is a starting range, not a guaranteed endpoint. Look especially at the thick white around the yolk: it must change from clear, jelly-like patches to opaque white that holds together.
- If the underside colours while the thick white is still clear, turn the heat low. Place the fitted lid on by its knob, using a dry glove if hot, and check after 20 to 30 seconds. Lift the far edge first so steam goes away from your face and hand, then set the lid on its heatproof landing place. Repeat short checks if needed. Do not pour water into hot fat. A white film may form over the yolk, turning the appearance towards a covered-basted egg.
- For a suitable soft result, stop when the white is set and the yolk has the chosen softness. If you require a firm yolk, use the turned over-hard finish below rather than assuming set white is enough. Switch off the ring. Put the pan securely on the trivet, using a dry glove if its handle is hot, then slide the turner far enough under the egg to support it and lift it low onto the counter-supported plate. Serve promptly. If the centre is uncertain, check it with the fork on the plate and use the linked immediate further-cooking method if it needs to be firmer.
Over easy, medium or hard: turn once the base is set
- Stir, whisk, fold and turn: four different movementsSupport the egg with a turner and keep the flip low over the pan.
- Boiled eggs: soft, jammy and hardFinish a just-cooked egg whose opened centre needs further cooking.
- Start with the gentle fat and egg-lowering steps above. Wait until the white holds together as a sheet; ease the turner under an edge, then support most of the egg. If the base sticks or is still liquid, stop pulling, lower the heat if colouring too fast, and allow it to set a little more.
- Keep the pan resting on the ring. Lift the supported egg only a little above the base, smoothly roll the turner so the egg turns onto its other side, and lower it gently. Do not flick the pan or throw the egg. A broken yolk is not a failed meal: choose over hard and cook it fully.
- For over easy, start checking the second side after about 15 to 30 seconds. Its white should be set while the centre stays runny. For over medium, continue checking in roughly 30-second steps for a thick, partly set yolk. You cannot reliably see that hidden centre from the browned outside; splitting the plated egg is the clearest comparison. These soft styles need suitable eggs.
- For over hard, continue at gentle heat until the yolk is firm through the centre, often needing another 1 to 2 minutes after turning, but sometimes longer. If the outside browns before the centre firms, lower the heat and use the short lid-on checks described above. Time, browning and a white cap do not prove a firm centre.
- Switch off the ring, land the pan on the trivet and support the egg with the turner onto the plate on the counter. Split the centre with the clean fork. For over hard, look for firm set yolk throughout, not a runny pool or soft paste hidden inside. If it is softer than required, use the linked immediate piecewise pan finish; do not serve it as fully cooked. Serve promptly once it suits the chosen safe endpoint.
Crispy edge: give the surface more heat
- Boiled eggs: soft, jammy and hardFinish a just-cooked egg whose opened centre needs further cooking.
- Make this a later attempt once the gentle method is comfortable. Start with a clean cooled suitable pan and 2 measured teaspoons (10 ml) oil in total. Warm on medium, increasing only if needed and permitted by the pan maker; do not use boost, maximum heat or smoking oil to chase a crisp edge.
- Lower the checked egg from its cup as above, put the cup down and keep hands and face back from spits. The thin white should bubble into golden lacy edges. Watch continuously. If oil spits strongly, turn the heat down or off and let it settle; do not add water or move a spitting pan around.
- If the edge darkens before the thick white sets, lower the heat and use brief fitted-lid checks, lifting away from steam. For a firm-yolk requirement, turn and finish over hard at gentle heat. Crispness alone does not cook a hidden centre. Black edges and an acrid smell mean the heat has gone too far, not that the egg needs more fierce heat.
- When the thick white is set and the centre suits the chosen egg-safety endpoint, switch off. Put the pan on its trivet and use the turner to lift the egg onto the supported plate. Check a doubtful centre with the fork and use the immediate further-cooking link if needed. Let the pan and oil cool safely before cleaning; do not empty hot oil into the sink.
Basted: set the top with hot fat or trapped steam
- Boiled eggs: soft, jammy and hardFinish a just-cooked egg whose opened centre needs further cooking.
- How to use hob heat without guessingKnow the safe response before using hot oil.
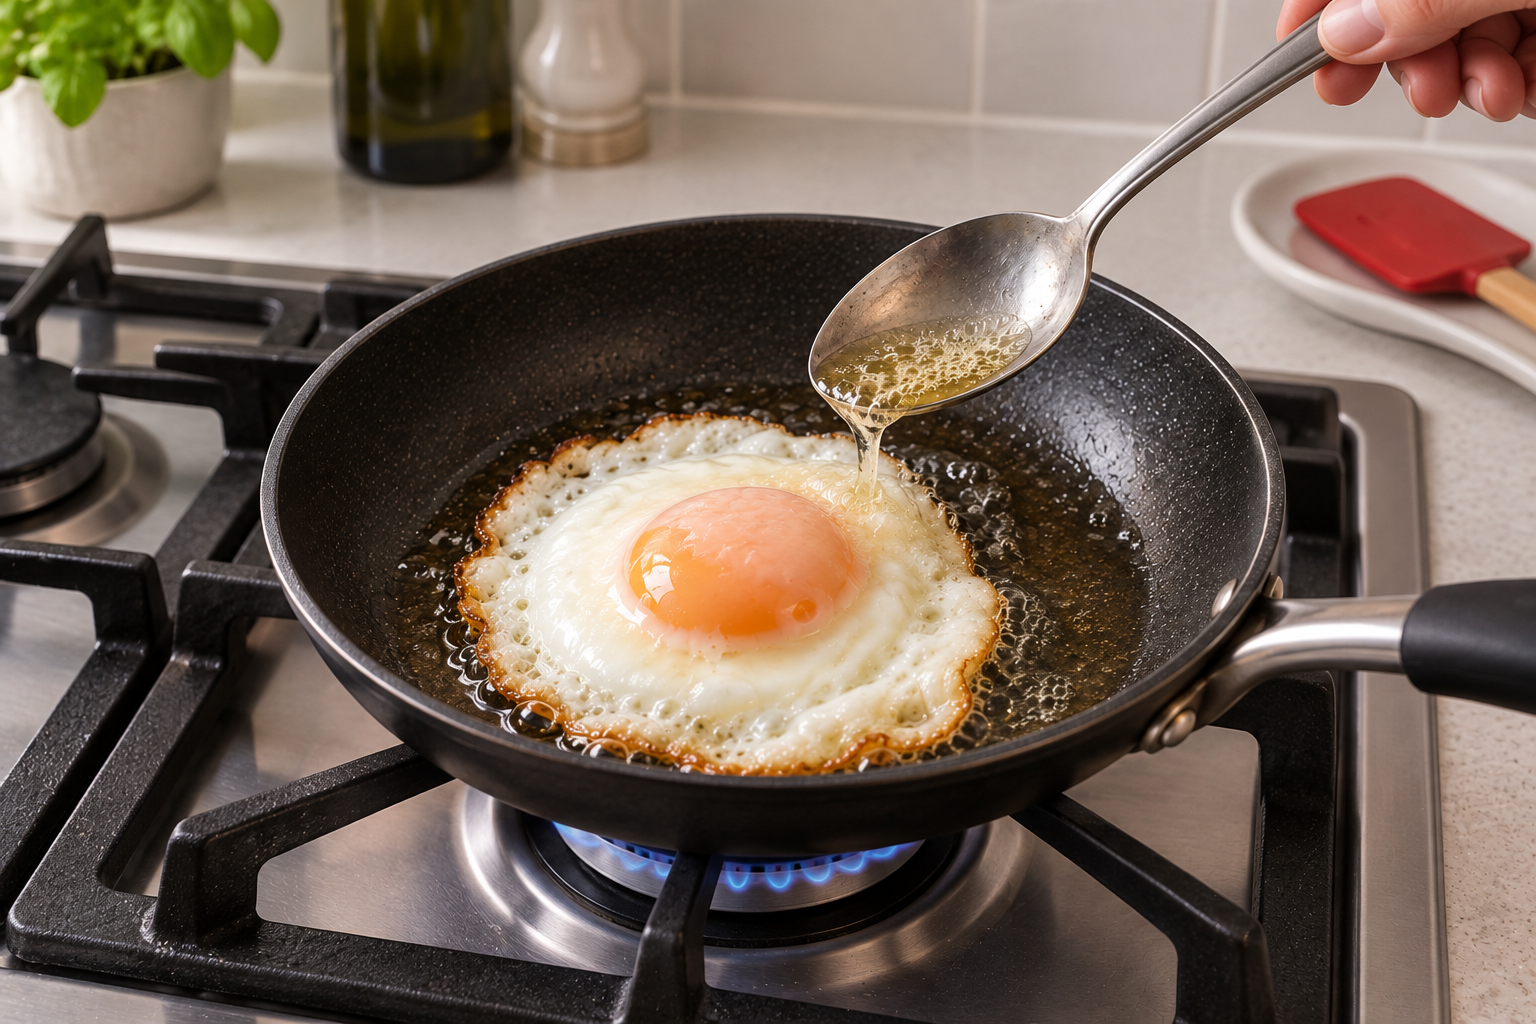
Basting brings heat to the top without flipping. For a first attempt, use the gentle sunny-side preparation and its short fitted-lid checks: moisture from the egg supplies the steam. Keep the pan flat, lift the far lid edge away from yourself and add no water. This often forms a thin white cap over the yolk. The cap is not a firm-centre test; select suitable eggs for a soft centre, or use the over-hard finish when full cooking is needed.
Hot-fat basting is optional later practice. Set out a long-handled metal spoon as well as the turner and use 2 measured tablespoons (30 ml) oil in total in the small pan, not in addition to the ordinary method's oil. Warm gently at medium-low, lower the checked egg and let its base set. Keep the pan flat on the ring. At an exposed edge, dip the spoon bowl into the oil without scraping the pan coating, lift a small spoonful and pour gently from just above the thick white. Keep your grip well back from the hot bowl. Repeat slowly, watching for the thick white to become opaque. Do not tilt the pan towards yourself to gather oil. If there is no easy shallow pool to scoop, stop and use the covered finish; do not improvise with extra oil or a dangerously angled pan.
If oil spits strongly, stop spooning and turn the heat down or off, keeping clear until it settles. A safely accessible fitted lid can finish a calm pan as above; it is not a reason to reach through spits or flames. When the egg suits the chosen endpoint, switch off and serve with the turner, not the oil-filled spoon, from a pan supported on its trivet. Check any uncertain centre and use the further-cooking link if required. A pan fire is different from normal frying: do not add water or carry the pan; follow the hob lesson's emergency advice.
Sticking, broken yolks and overcooked edges
If the egg sticks, lower the heat and work the flexible turner underneath from the edge; do not scrape a coated surface with metal. A broken yolk can be cooked through for a sandwich. Brown, leathery edges will not soften back into a delicate white, but the centre may still be useful if safely cooked. Clean the pan once cooled before trying another egg so burnt residue does not affect the next result.
Once cooking is finished, confirm the controls are off. Let the pan cool where it cannot be knocked, then clean it and raw-egg tools using the setup lesson. A browned edge is not evidence that a hidden yolk is fully cooked. For this practice make only what you plan to eat; leftover handling needs the separate storage lesson.
Compare two attempts
Make one chosen style on this occasion and a different style another time, not two unfamiliar hot tasks at once. Note the pan, heat, time and how easily the turner slid underneath. Split each plated egg with the fork to compare its centre. Change one detail in small steps next time. A firmer-than-planned yolk can still be a useful meal; a softer-than-required one needs the immediate finish above.
Sources and further reading
- Food Standards Agency: home egg safety and storage
- Food Standards Agency: egg hygiene, assurance and clinical exception
- British Egg Information Service: fried-egg styles and brief second-side cooking
- British Egg Information Service: spoon-basting method
- London Fire Brigade: unattended heat, cloths and handles